Home
Integrations Library
Media Buying Integrations
Whop Ads Integration

SERIES:

Whop Ads Integration

Learn how to set up the Whop Ads Integration in Everflow, configure your partner postback, and troubleshoot your completed setup.

Beta

The Whop Ads integration is currently in beta. It is live and you can set it up today, but it is still being rolled out, so speak to your account manager before you build a campaign around it.

Overview

Some advertisers cannot run their own ad platform pixels. In restricted verticals such as telehealth, supplements and financial offers, ad accounts get flagged and shut off, and partners are reluctant to put a brand's pixel on their own domains. The Whop Ads Integration solves that by sending accurate conversion data via server-to-server (S2S) postbacks from your advertising campaigns to Everflow. Everflow then sends the data, along with the click context, to Whop to distribute the data to ad platforms such as Meta (available on Google and TikTok soon). 

By using the Whop Ads Integration, you can optimize your campaigns and track your conversions securely without the risk of running browser-side tracking on your website.

How the Whop Ads Integration Works with Everflow

Once you set up the Whop Ads Integration in Everflow, Everflow and Whop work together to send server-side conversion data to track your conversion events. 

How the Whop Ads Integration Works with Everflow
👆
1. Visitor Clicks
A visitor clicks your partner's link and arrives on the landing page with the Everflow JavaScript SDK installed.
🔗
2. Whop Adds the Flag
On the click, Whop adds the flag utm_whop=true to the Offer URL to mark Whop traffic.
📝
3. Everflow Records the Click
Everflow ingests the incoming URL parameters from Whop and registers the click context.
✅
4. Visitor Completes Action
Once the conversion occurs, Everflow connects the action to the click through the transaction ID.
📧
5. Everflow Sends Data to Whop
Everflow sends a S2S event to Whop containing the conversion data and click context.
🔀
6. Whop Routes the Data
Whop works out which ad platform the original click came from and re-emits the event there.

Why the Whop Ads Integration is Unique

The Whop Ads Integration is supported by the Whop Conversions API (CAPI). There are two main differences between the Whop CAPI and a standard CAPI: automatic data transfer and click context.

1. Automatic Data Transfer

No mapping identity fields:You do not need to map identity fields in the postback form. Everflow forwards these fields to Whop automatically, given that these fields are provided at the time of the conversion.
The following fields are passed automatically to Whop:
email
phone
username
first_name
last_name
city
state
postal_code
state
country
Whop does not accept hashed identity fields. Hashed values from identity fields, such as email addresses, are treated as invalid and dropped.
Pass identity field values as they are. The more identity fields a conversion carries, the better Whop and the destination platform can match the data to a real person.

2. Click Context Capture

Click context instead of click capture: Whop Ads Integration does not own the click, so click context is parsed from the incoming parameters of your Offer URL when traffic is directed to your page via Whop.
A query parameter confirms Whop traffic: Once a visitor clicks the ad, Whop confirms the traffic by appending the query parameter utm_whop=true automatically to your Offer URL.
Everflow JS SDK detects the parameter: The Everflow JS SDK detects the flag utm_whop=true on the incoming URL from Whop and stores the required click context without impacting your standard traffic or active efforts.

Prerequisites

Ensure that you have following requirements to set up your Whop Ads Integration in Everflow:

A Whop Account ID and API key with event:create write permissions
An active advertising account on Meta (Google and TikTok available soon)
A partner and offer with direct linking created in Everflow

Before you begin

Set up your Whop Ads Integration.

No Whop account yet?

You need one before any of the steps below. Creating a business in Whop gives you the Account ID and the Developer area where the API key lives.

If you have an existing Whop account, but you do not have API access, ask your Whop contact.

1
Obtain your Whop Account ID.
Sign into the right Whop account for your business. You can find your Account ID in the URL in your web browser. The Account ID starts with biz_ followed by alphanumeric characters, such as biz_a12Bc45DEfgH.
Account ID in Whop URL
2
Create your Whop API key
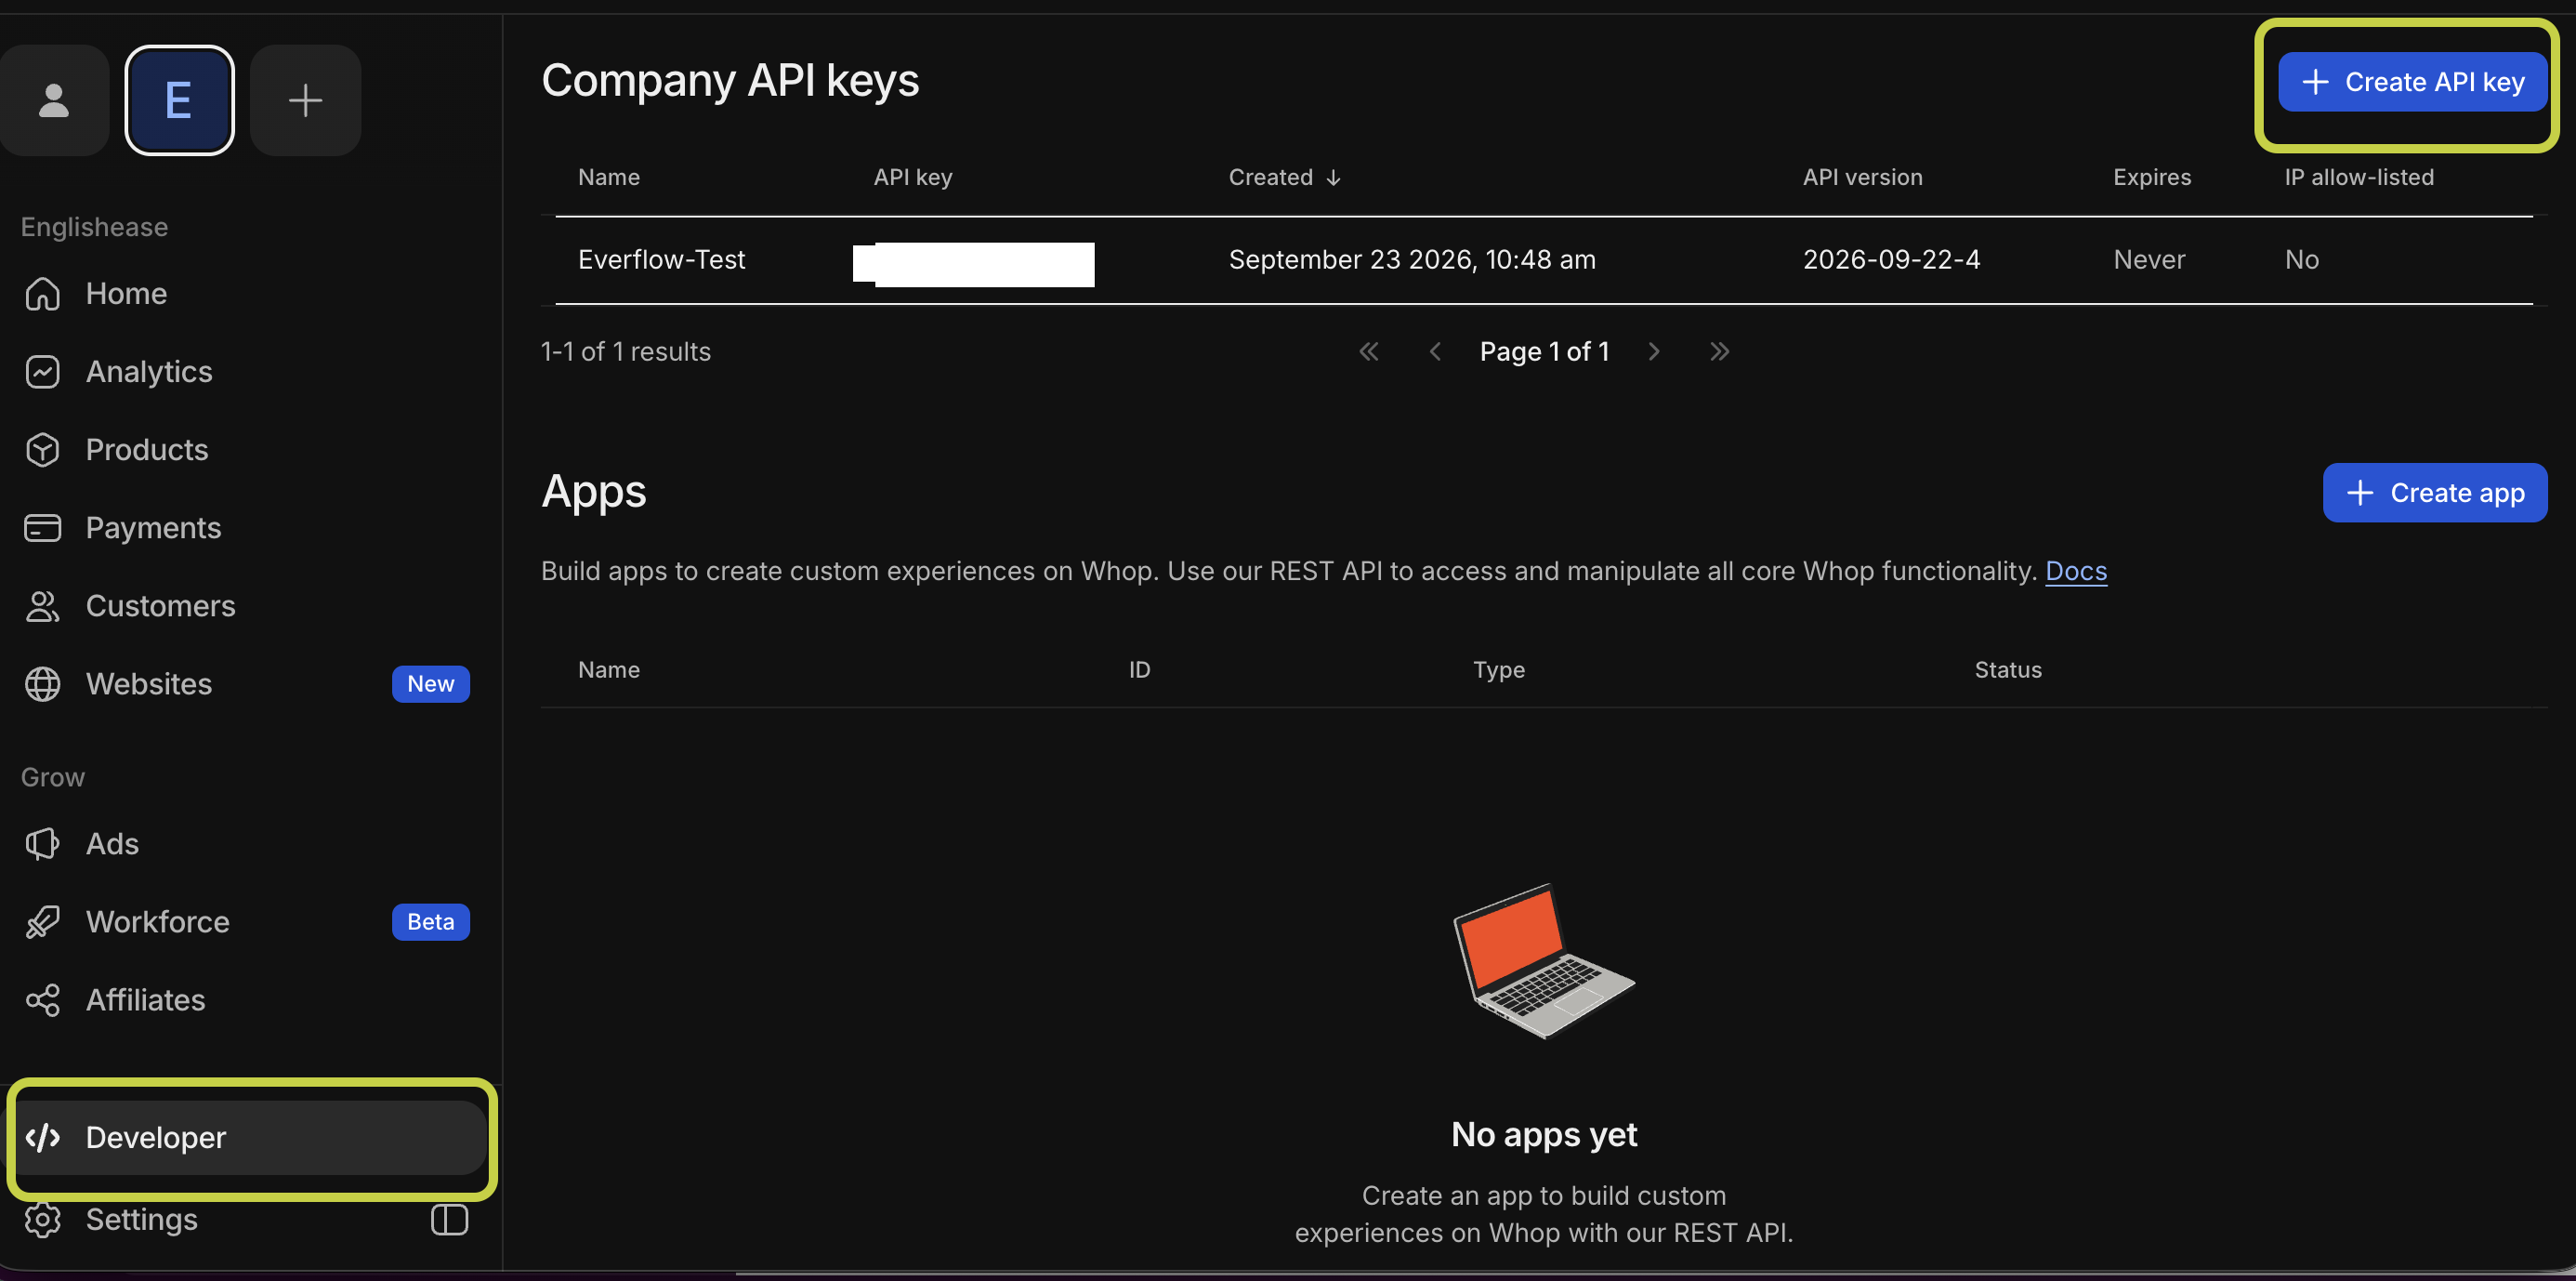
In the Whop account for your business, go to your dashboard and click on Developer tab.
Click on the + Create API key button.
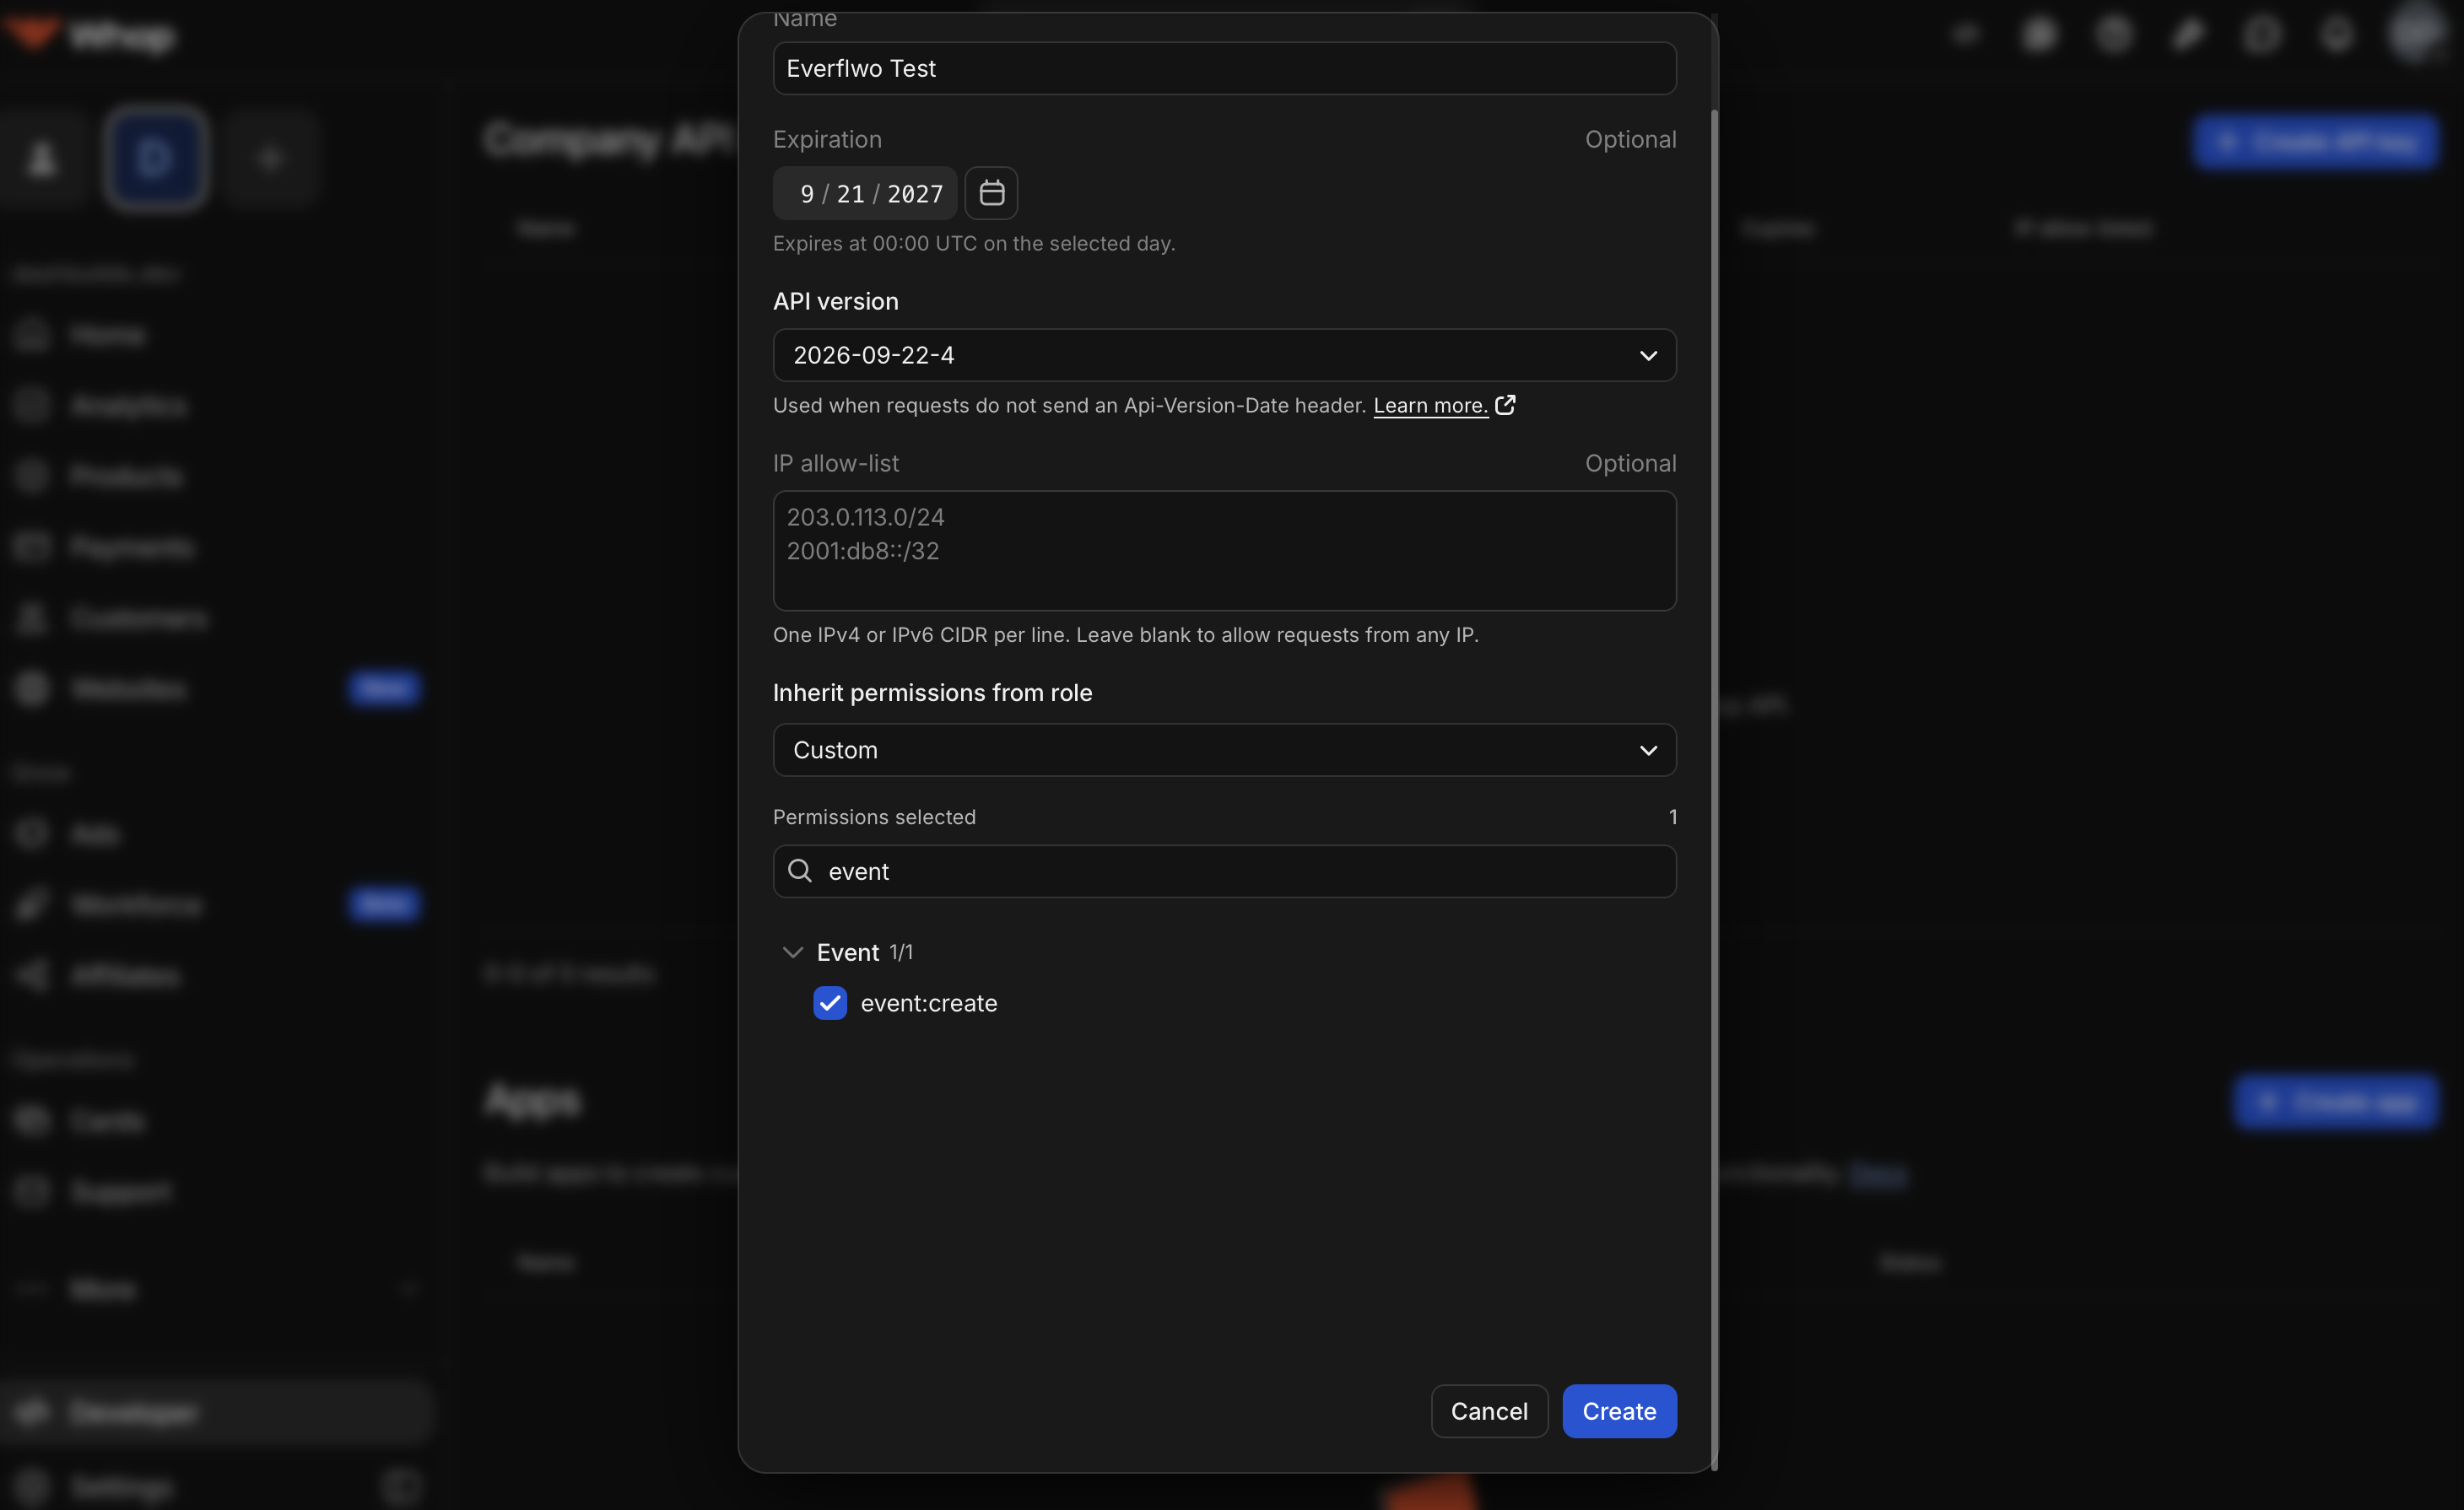
In the popup window, give your API key a memorable name such as “Everflow-FBOffer-May2026”.
In the Permissions selected field, give your API key the event:create permissions.
Click Create.
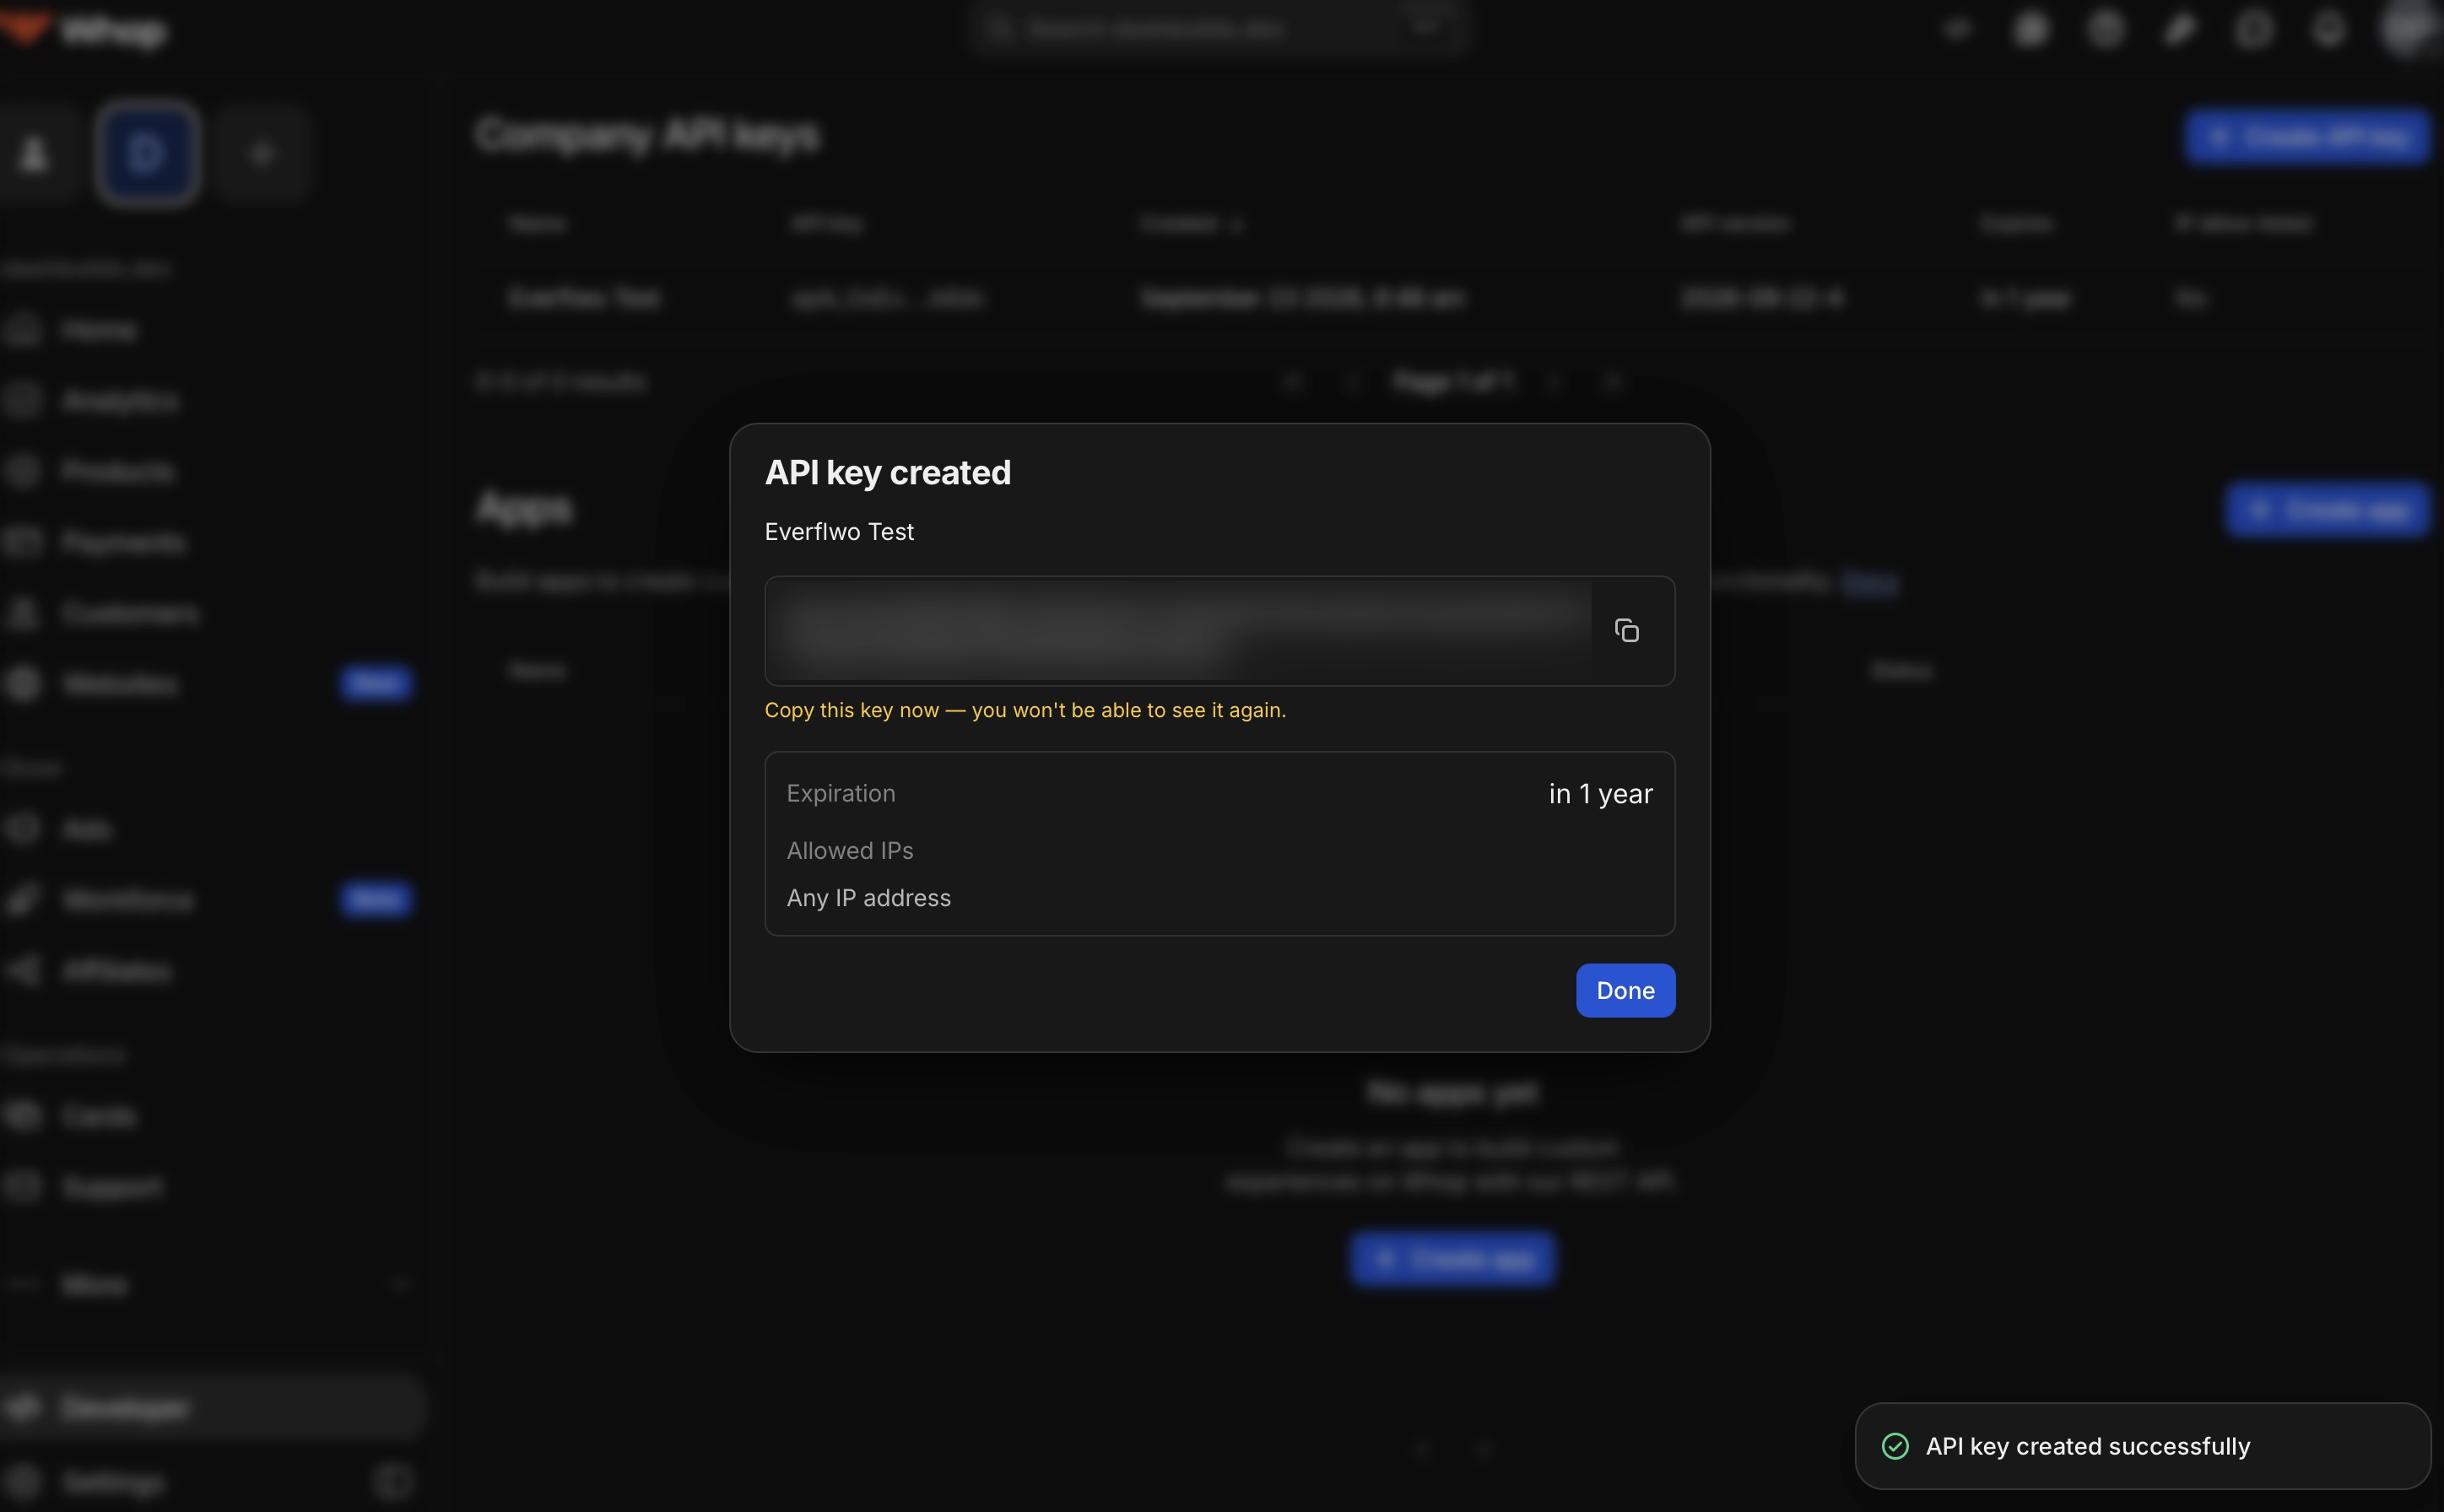
Copy the API key immediately and store it in a safe place. Whop displays the full API key once when issued.
Company API keys live under Developer in the left-hand navigation menu
The Create API key dialog with event searched in the permissions box and event:create ticked, showing Permissions selected as 1
Search <event:create> in the  Permissions selected input box
The API key created dialog, with the key value blurred and the warning that it can only be seen once
Copy your API key immediately - the API key value appears once on the confirmation dialog
3
Keep your Whop API key server-side
You can paste the Whop API key in the Everflow integration form since Everflow stores the key masked and only uses the key server-side.
Do not store the API key in browser code, mobile apps, or public repositories.

Step-by-Step Guide

Note
Whop Ads Integration is the advertising product, but in your Everflow dashboard, you can find the Whop Ads Integration under the name Whop.
1
Add Whop Integration (Partner Side)
Switch to the Partner Platform to add the Whop integration.
Log into your Everflow Partner Platform either by using the partner user credentials or by impersonating them.
Go to
Company Settings → Integrations
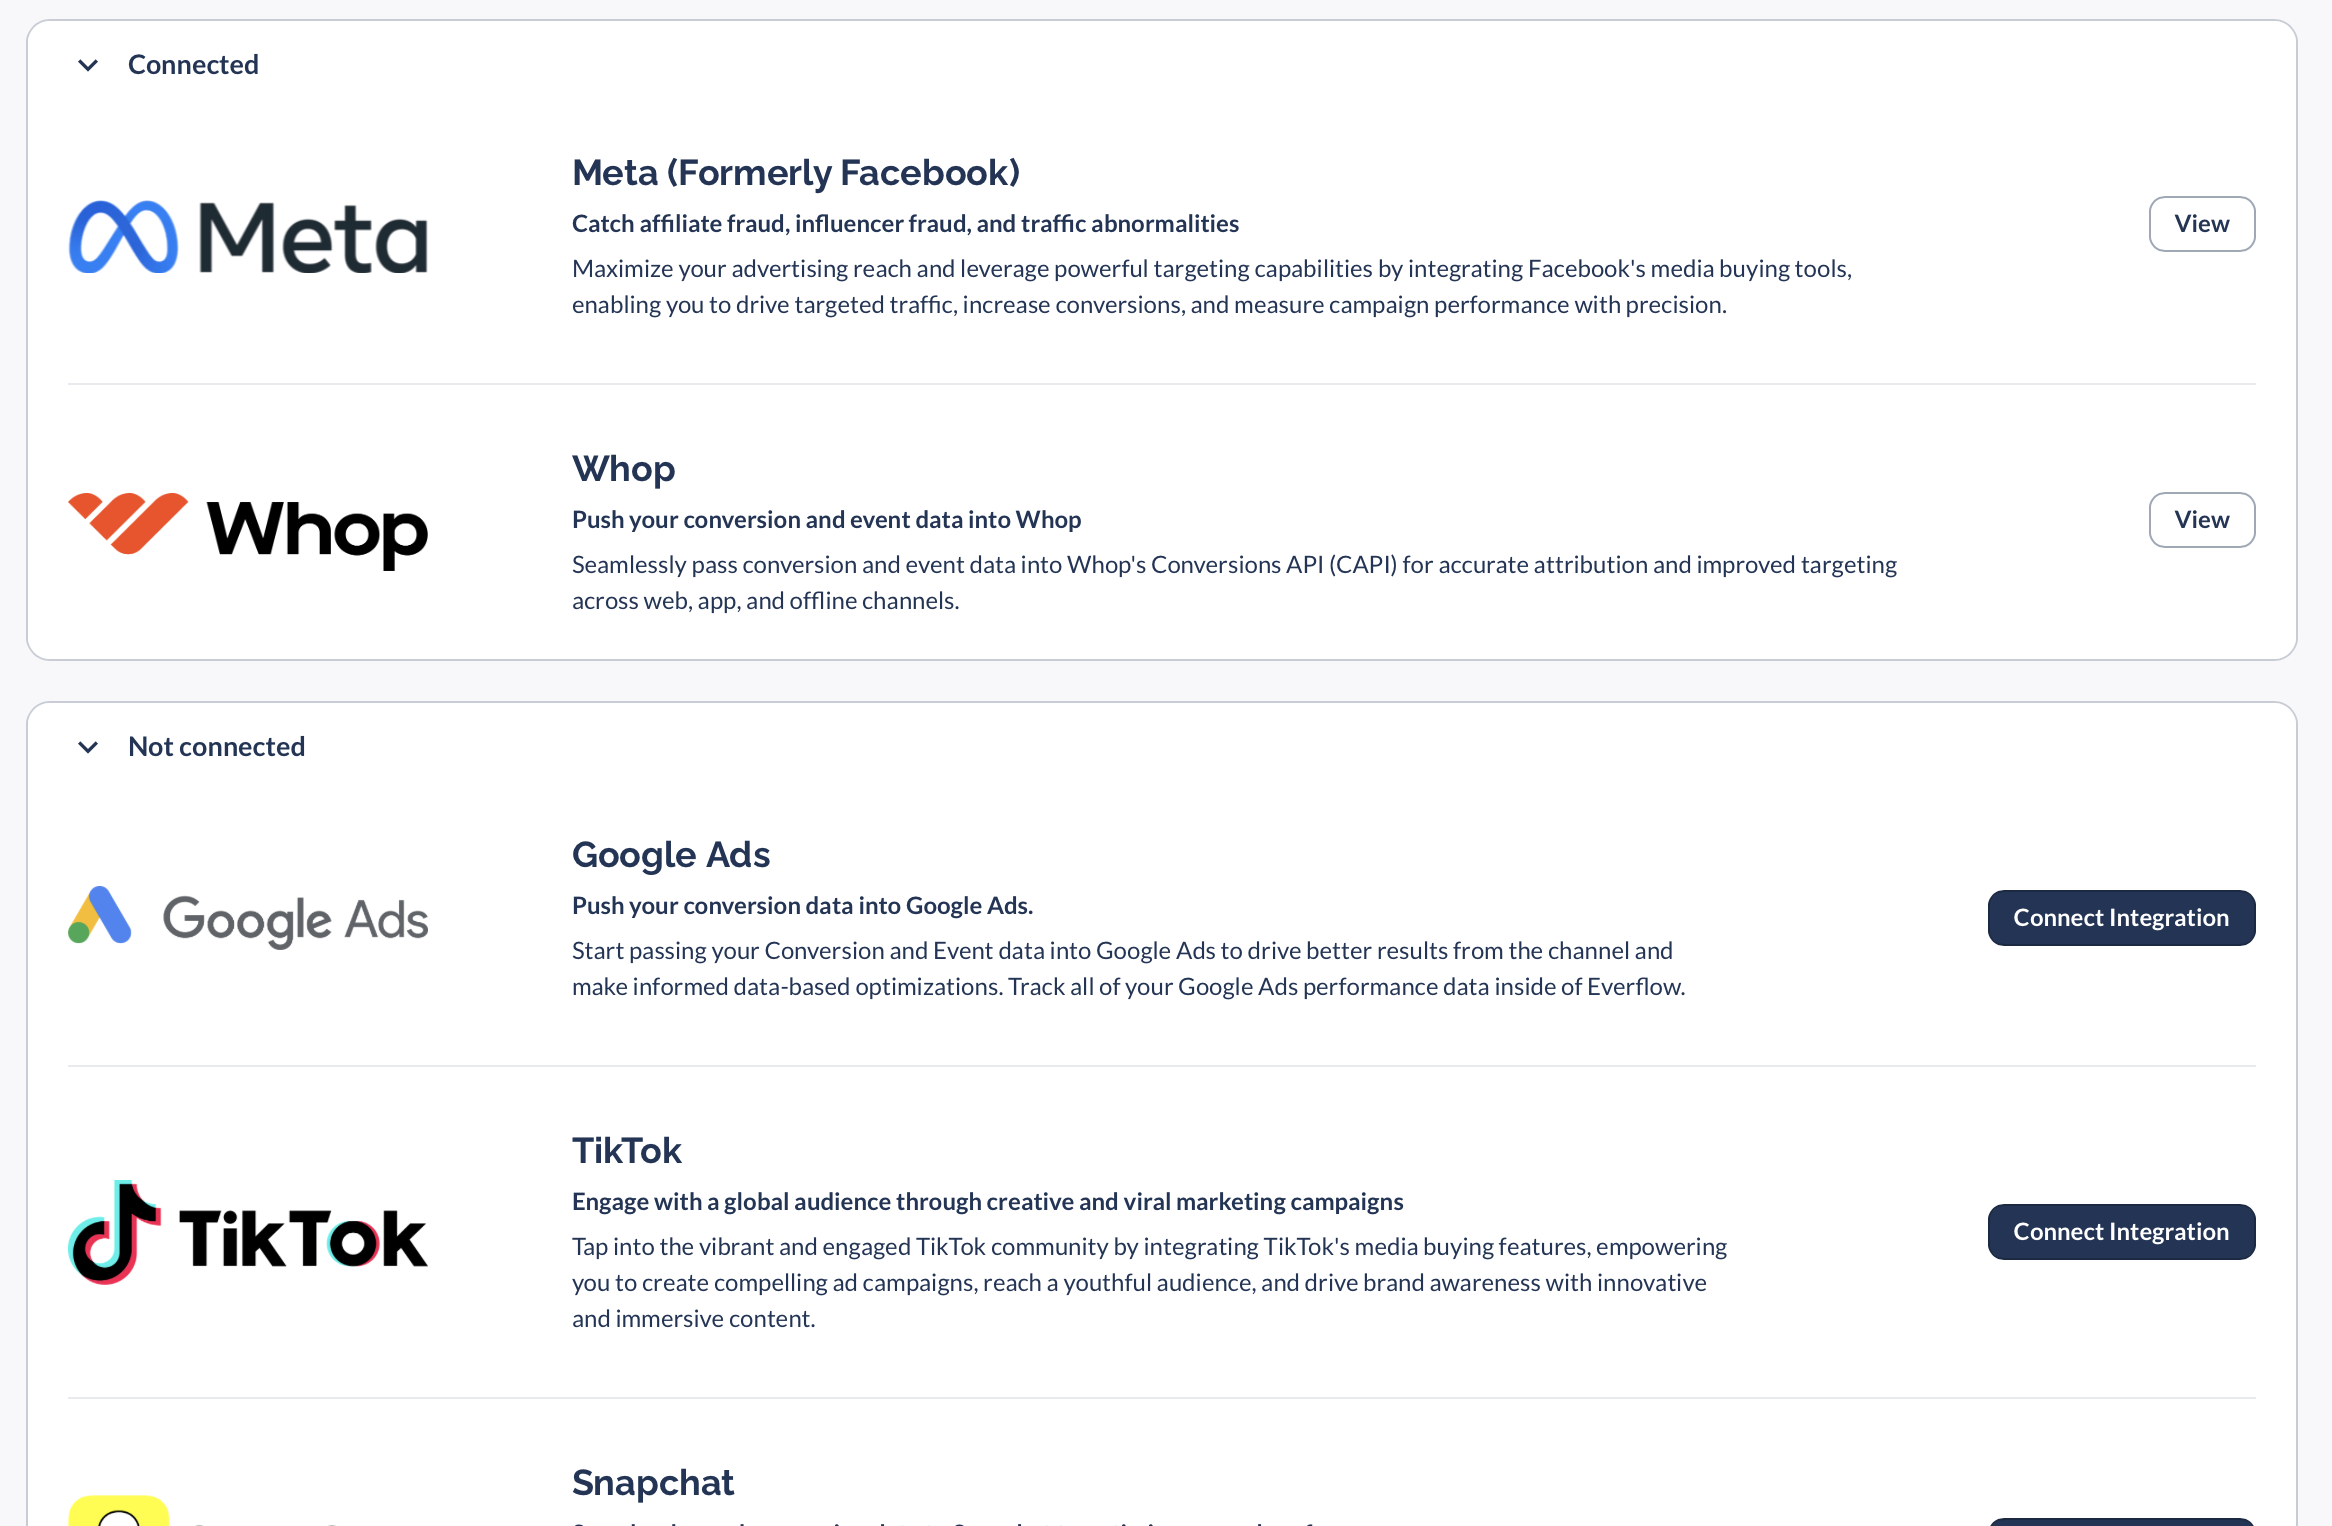
Find the Whop Integration card and select Add. Before setup, you can find Whop in the Not connected section. Once Whop is set up, the integration moves to Connected and the button becomes View.
Fill in the following text fields:
Name: Label your Whop integration for internal reference. The postback is chosen by this name later, so ensure that the name is descriptive.
Account ID: Enter your Whop Account ID. The account_ID is sent on every event.
API Key: Enter the API key with event:create permissions.

‍

The partner Integrations list, showing Whop under Connected and other platforms under Not connected
Integrations view once Whop is set up
2
Configure the Postback (Core Platform)
Go to
Partners → Postbacks → Add
Select the required fields for your Postback:
Status: Select Active status.
Postback Type: Select Conversion or Event. Select Event if you are sending a post-conversion event.
Postback Level: Select either Global or Specific.
Partner: Select a Partner from the dropdown menu.
Delivery Method: Select Whop from the dropdown menu.
Whop Integration: Select the Whop integration that you connected to Everflow.
Whop Event: You can select a standard Event for your Offer from the dropdown menu or select Custom and create a name. Custom Name is available only if Event Name = Custom.
Action Source: Select the site of the conversion from the dropdown menu.
Fill in the optional fields (Description, External ID, and Value) as you need:
Description: For your own reference of the integration.
External ID: Set your own identifier of the integration by using a macro such as {transaction_ID} or {sub_ID}.
Value: Set a macro value such as {payout}, {revenue}, or {sale_amount}, or a hardcoded monetary value.
Click Add.
Note
Depending on the Postback Type and Postback Level configuration that you choose, you might also need to select the Offer and Event as well. Learn more about configuring Partner Postbacks here.
3
View and Manage Integrations (Core Platform)
Go to
Integrations → Whop → View
to view each partner and their corresponding Whop integrations and Whop event names.
4
View Your Reports (Core Platform)
Once your integration is set up, you can go to
Reporting → Partner Postback
to view the individual Conversion or Event and the Partner Postback Details, including the event payload.

Troubleshooting

If you’re not seeing the utm_whop=true flag on the incoming URL, this means that the traffic didn’t come from Whop.
Configuration error: If you see a configuration error and the utm_whop=true flag is appended to the incoming URL, then there is a problem with the Everflow JS SDK.

Limitations

This integration does not report the sales that Whop processes. Whop records its own checkouts, subscriptions, and trials server-side. 

If you have both the Whop pixel and the SDK installed on the landing page, then this setup will result in duplicate record counting. 

This integration sends conversion events. The Whop Ads Integration does not touch the rest of the Whop product, and Everflow does not hold Whop's own identifiers for users, members, memberships, products or plans. Whop memberships, products and plans, payments and checkout, and Whop webhooks are all outside its scope.

Next in This Series