Home
Integrations Library
Media Buying Integrations
Meta (Facebook / Instagram) Integration

SERIES:

Meta (Facebook / Instagram) Integration

Connect your Everflow account to Meta's Conversions API to automatically send conversion data to Meta, improving ad optimization and performance tracking while gaining powerful analytics to scale winners and kill losing campaigns.

Overview

When you connect Meta (Facebook) to Everflow, you unlock better ad performance and complete campaign visibility. Here's what you get: Everflow automatically sends your conversion data to Meta using their Conversions API, which means Meta's algorithm receives real conversion information to optimize your campaigns. Plus, you get granular tracking and analytics to quickly identify winning campaigns and eliminate money-losing ads.

What's Changed Last updated Apr 8, 2026 ▼
Apr 8, 2026 Fixed
Empty user data fields (email, phone, name, zip) are omitted from CAPI payloads. This improves Event Match Quality scores in Meta Ads Manager.
This integration refers to what was previously called the Facebook integration.

This integration helps you build accurate audiences faster on Meta while giving you the data insights needed to scale profitable campaigns and cut losses quickly.

Prerequisites

Before setting up the Meta integration, ensure you have:

  • A Meta Business Manager account with admin access
  • An active advertising account in Meta
  • A partner and offer created in Everflow
  • JavaScript tracking implemented (click and conversion scripts on your landing and thank you pages)

A Step-By-Step Guide

Use the Conversions API Gateway method to generate your access token, as this is the recommended and tested approach.
1
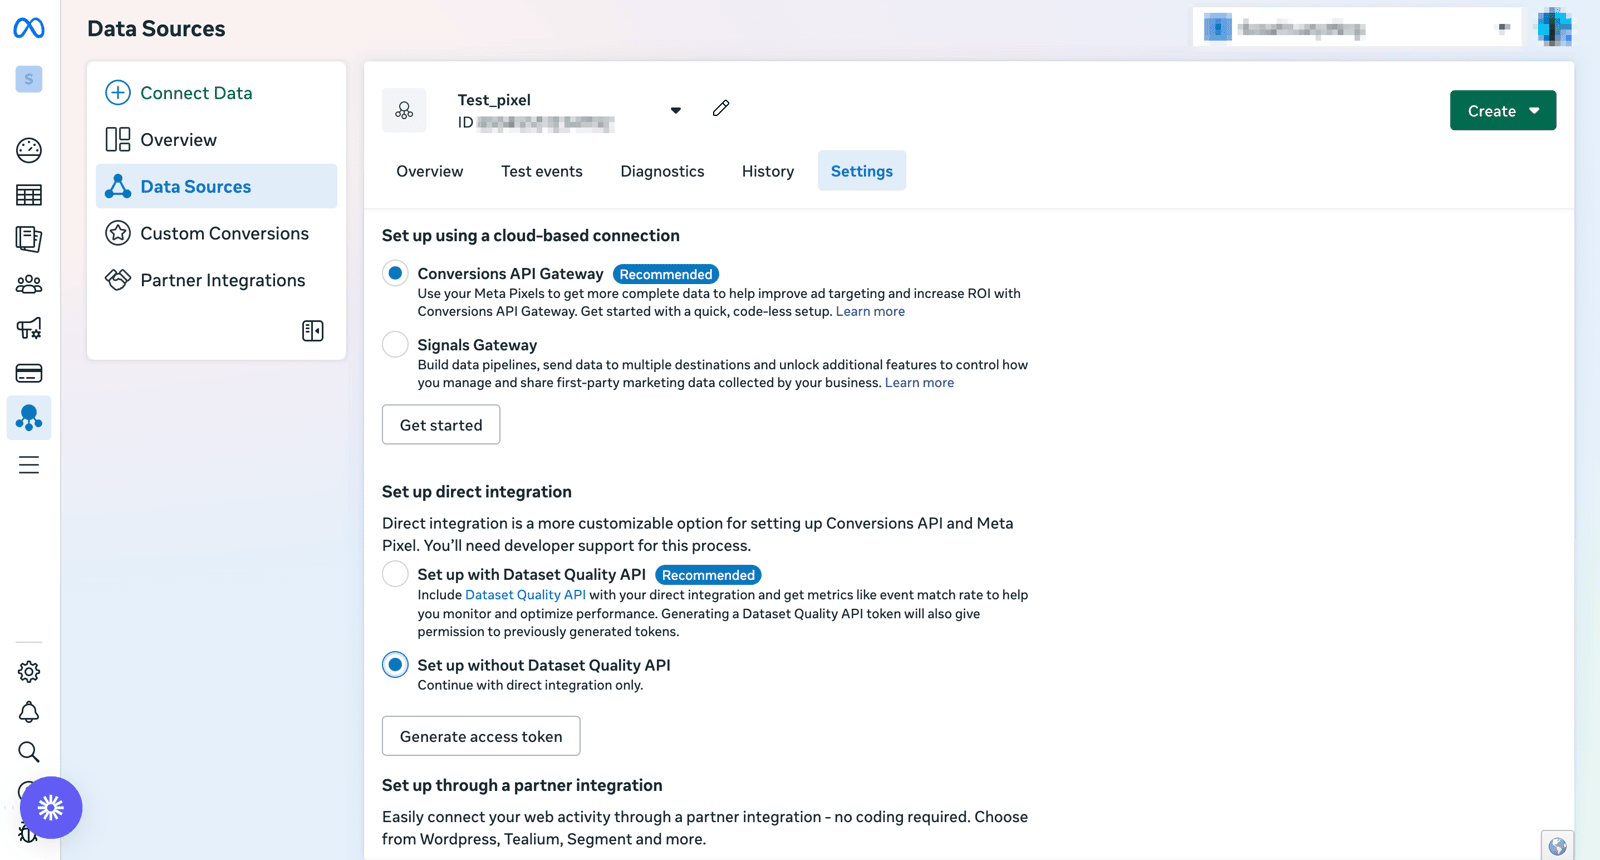
Generate Your Meta Access Token (Conversions API Gateway)
Navigate to
Meta Ads Manager → Events Manager
Select your
Meta Pixel
from the data sources
Go to
Settings → Conversions API
Click
Generate access token
Copy and save the token immediately - you won't be able to see it again once you close the window.
__wf_reserved_inherit
2
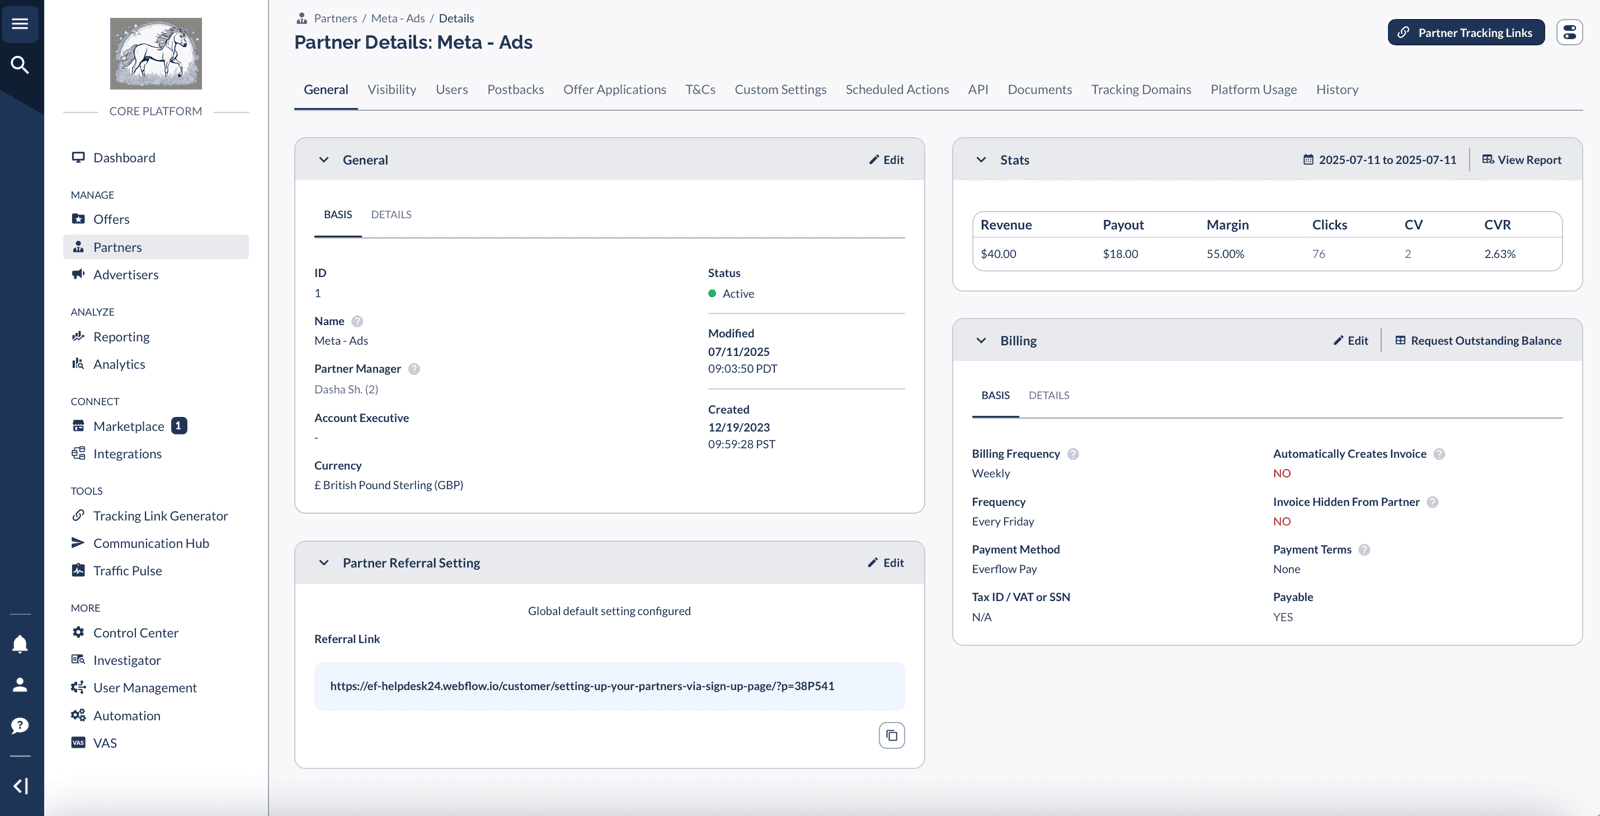
Create a Partner and Partner User
Set up a dedicated partner for Meta traffic:
In your
Everflow Core Platform
, go to
Partners → Manage
Click
Partner
Name it
"Meta"
or
"Meta Ads"
(this groups Facebook and Instagram traffic together)
Save
the Partner
Create a Partner User for this partner
Note the Partner login credentials
Why this matters: Creating a separate Meta partner helps you filter paid vs organic traffic from Facebook and Instagram, which is key to understanding your funnel's full performance impact.
__wf_reserved_inherit
3
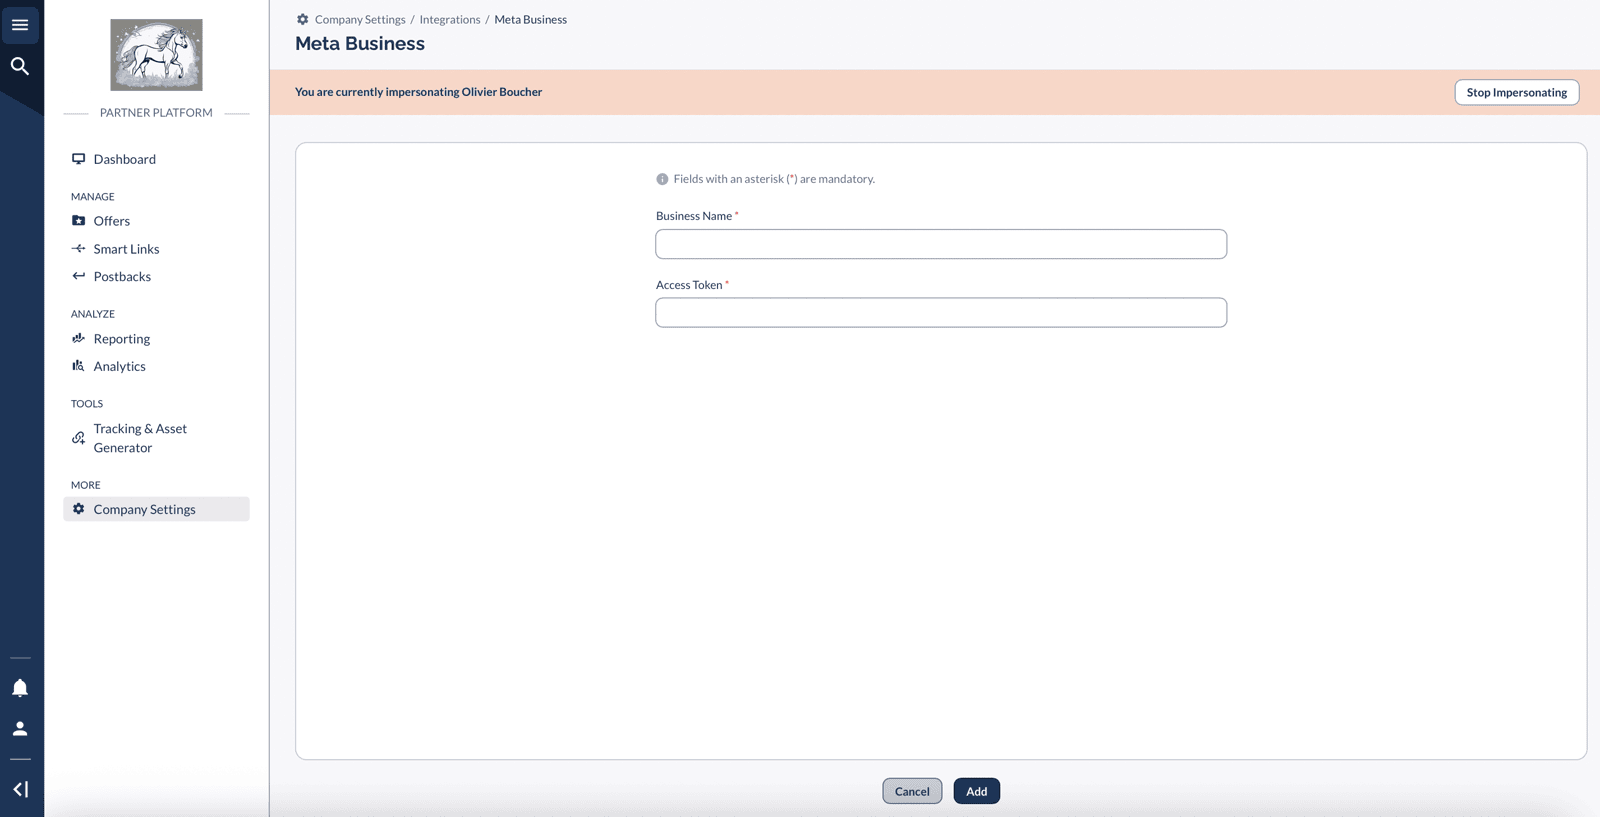
Connect Meta Integration (Partner Side)
Now switch to the Partner Platform to add the Meta integration:
Log into your
Everflow Partner Platform
using the partner user credentials or impersonating them
Go to
Company Settings →
Integrations
Click
Add Business
on the
Meta
card
Fill in the form:
Business Name: Choose any name you want
Access Token: Paste the token from Step 1
Click
Add
__wf_reserved_inherit
4
Configure Meta Postbacks (Core Platform)
Switch back to your Core Platform to set up the postback:
In your
Everflow Core Platform
, go to
Integrations → Media Buying → Meta
Click
Connect Integration
(this redirects you to the postback setup form)
Configure these fields:
Postback Level: Select "Specific" and choose your offer
Meta Business: Choose the business you created in Step 3
Meta Pixel: Select your Pixel ID
Meta Event Name: Choose your primary conversion event (usually "Purchase" for e-commerce or "Lead" for lead gen)
Action Source: Enter where conversions happen (see Meta's documentation)
Event Source URL: Add the webpage URL where conversions occur
Set Up Your Conversion Goal
  • E-commerce brands: Purchase
  • Lead generation: Lead
  • App companies: App Install
Optional: Add Purchase Data (For E-commerce)
Click
Add
under
Meta Custom Data
Add
Currency
with value {offer_currency}
Click
Add
again
Add
Value
with value {payout_amount}

Add User Data for Better Audience Matching

Scroll to
Meta User Data
Click
Add
Select
Fbc
as Data Field
Enter this value: fb.1.{timestamp}.{fbclid}
Add as many additional data fields as possible (email, phone, etc.) to improve match quality
Pro Tip!
More user data fields = faster audience matching and better Meta optimization.
Heads up: Meta CAPI is auto-hashed

You don't need to add hashing macros like {adv1>LC_SHA256} for Meta CAPI postbacks. Everflow auto-hashes all macros in the CAPI payload before it's sent. For non-Meta integrations where you need to hash data yourself, the macro syntax lives in Your Guide to Parameters & Macros → Hashing Macros.
5
Set Up Funnel Events
Don't stop at one conversion event. Set up your full marketing funnel to help Meta understand your audience better:
Recommended E-commerce Events:
View Product
Add to Cart
Initiate Checkout
Purchase (primary goal)
Recommended Lead Gen Events:
View Landing Page
View Pricing
View Demo Page
Email Click
Lead (primary goal)
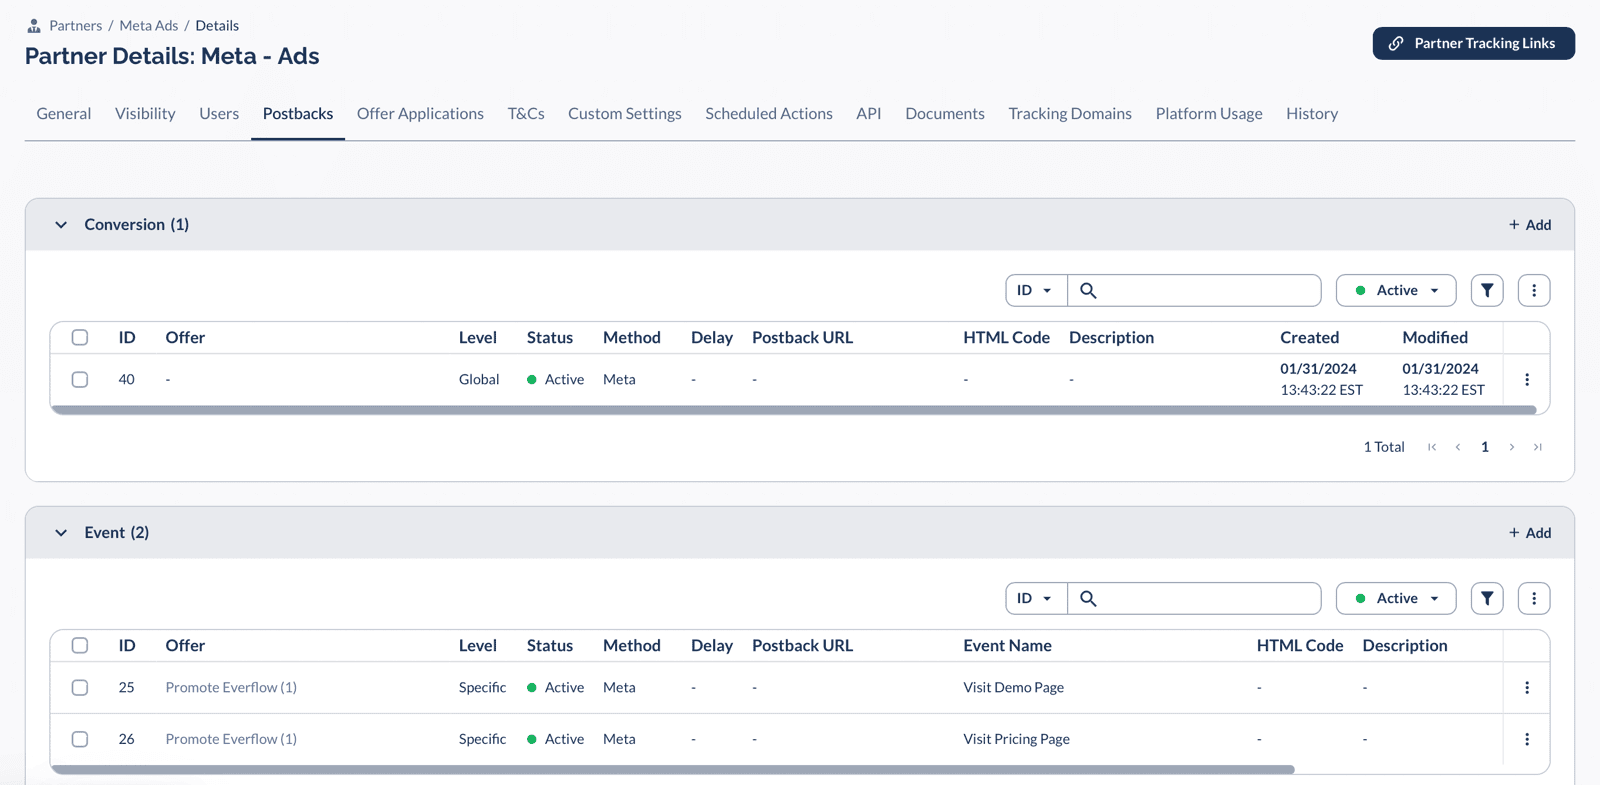
To add these events:
Go to
Partner -> Postbacks
Find the
Events
table (second table after Conversions)
Add each funnel event with the same Meta configuration
Sending your full funnel to Meta allows faster audience identification and enables retargeting campaigns later.
__wf_reserved_inherit
6
Set Up Campaign Tracking
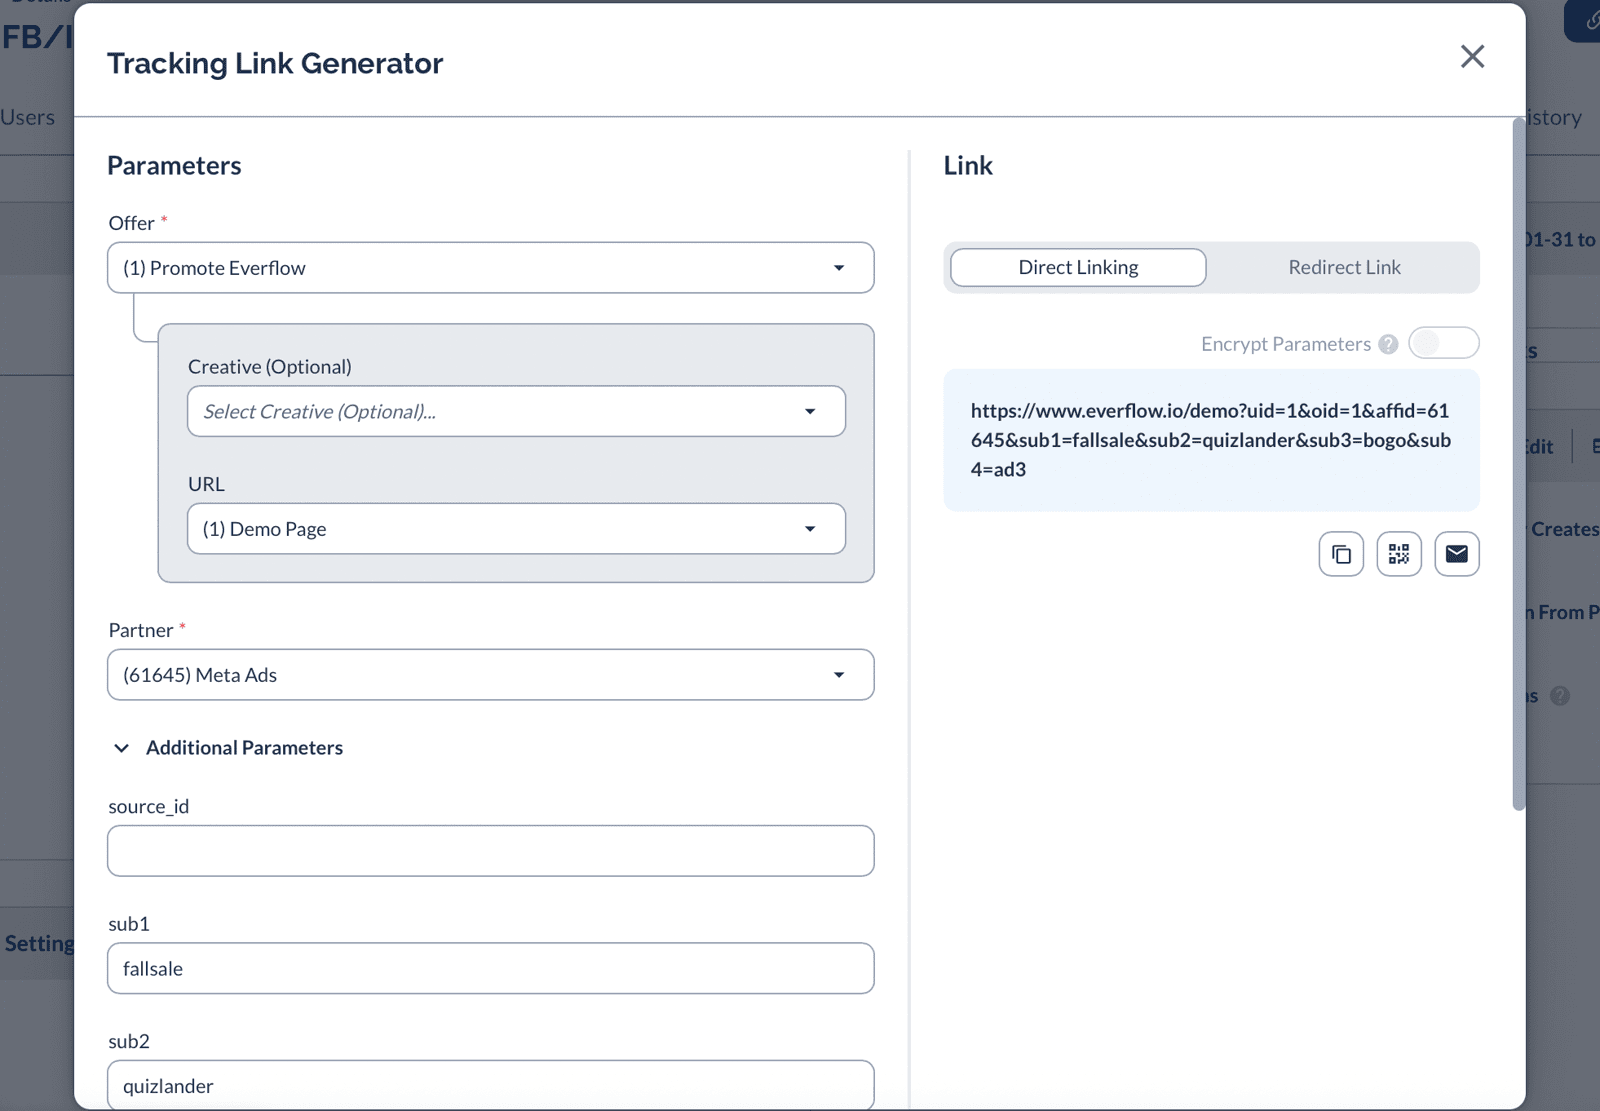
Use Everflow's Tracking Link Generator to create trackable links:
Go to
Tools → Tracking Link Generator
Select your Offer
Choose your Meta partner
Configure Sub IDs to track performance (just examples):
Sub ID 1: Campaign name or sale type (e.g., "BOGO", "Summer Sale")
Sub ID 2: Landing page or creative identifier (e.g., "Quiz", "Ad3")
Good To Know
Include campaign name, landing page, and creative info in your Sub IDs to quickly identify what's working.
__wf_reserved_inherit

Track & Optimize Performance

Monitor Key Metrics with Partner Report

Go to
Reporting → Partner Report
Filter by your
Meta partner
Watch these key metrics:
Clicks: Traffic volume
Conversions: Success rate
Cost Per Action (CPA): Efficiency
Return on Ad Spend (ROAS): Profitability

Action Triggers:

  • High ROAS (4:1 or better): Scale this campaign immediately
  • Low ROAS (under 1:1): Pause and investigate
  • Good volume, poor conversion: Check landing page or offer

Analyze Winners with Dimensional Analytics

Go to
Analytics → Dimensional Report
Add dimensions:
Offer, Partner, Sub ID 1, Sub ID 2
Filter for your
Meta Partner
and specific offer
Identify top-performing combinations of landing pages and creatives

Get Granular Insights with Flex Report

Go to
Analytics → Flex Report
Filter for your offer and Meta partner
See exact performance by landing page and creative combinations
Use this data to:
Create new ads with winning creative + landing page combos
Scale existing high-performers
Cut underperforming creative and landing page combinations

Essential Tracking Setup

For accurate attribution, ensure fbclid is properly passed:

  • Direct Linking: The EF.click script automatically captures fbclid from URLs
  • Not Direct Linking: Add &fbclid={fbclid} to your affiliate tracking links

Passing Advertiser Parameters (adv1-adv10) to Meta

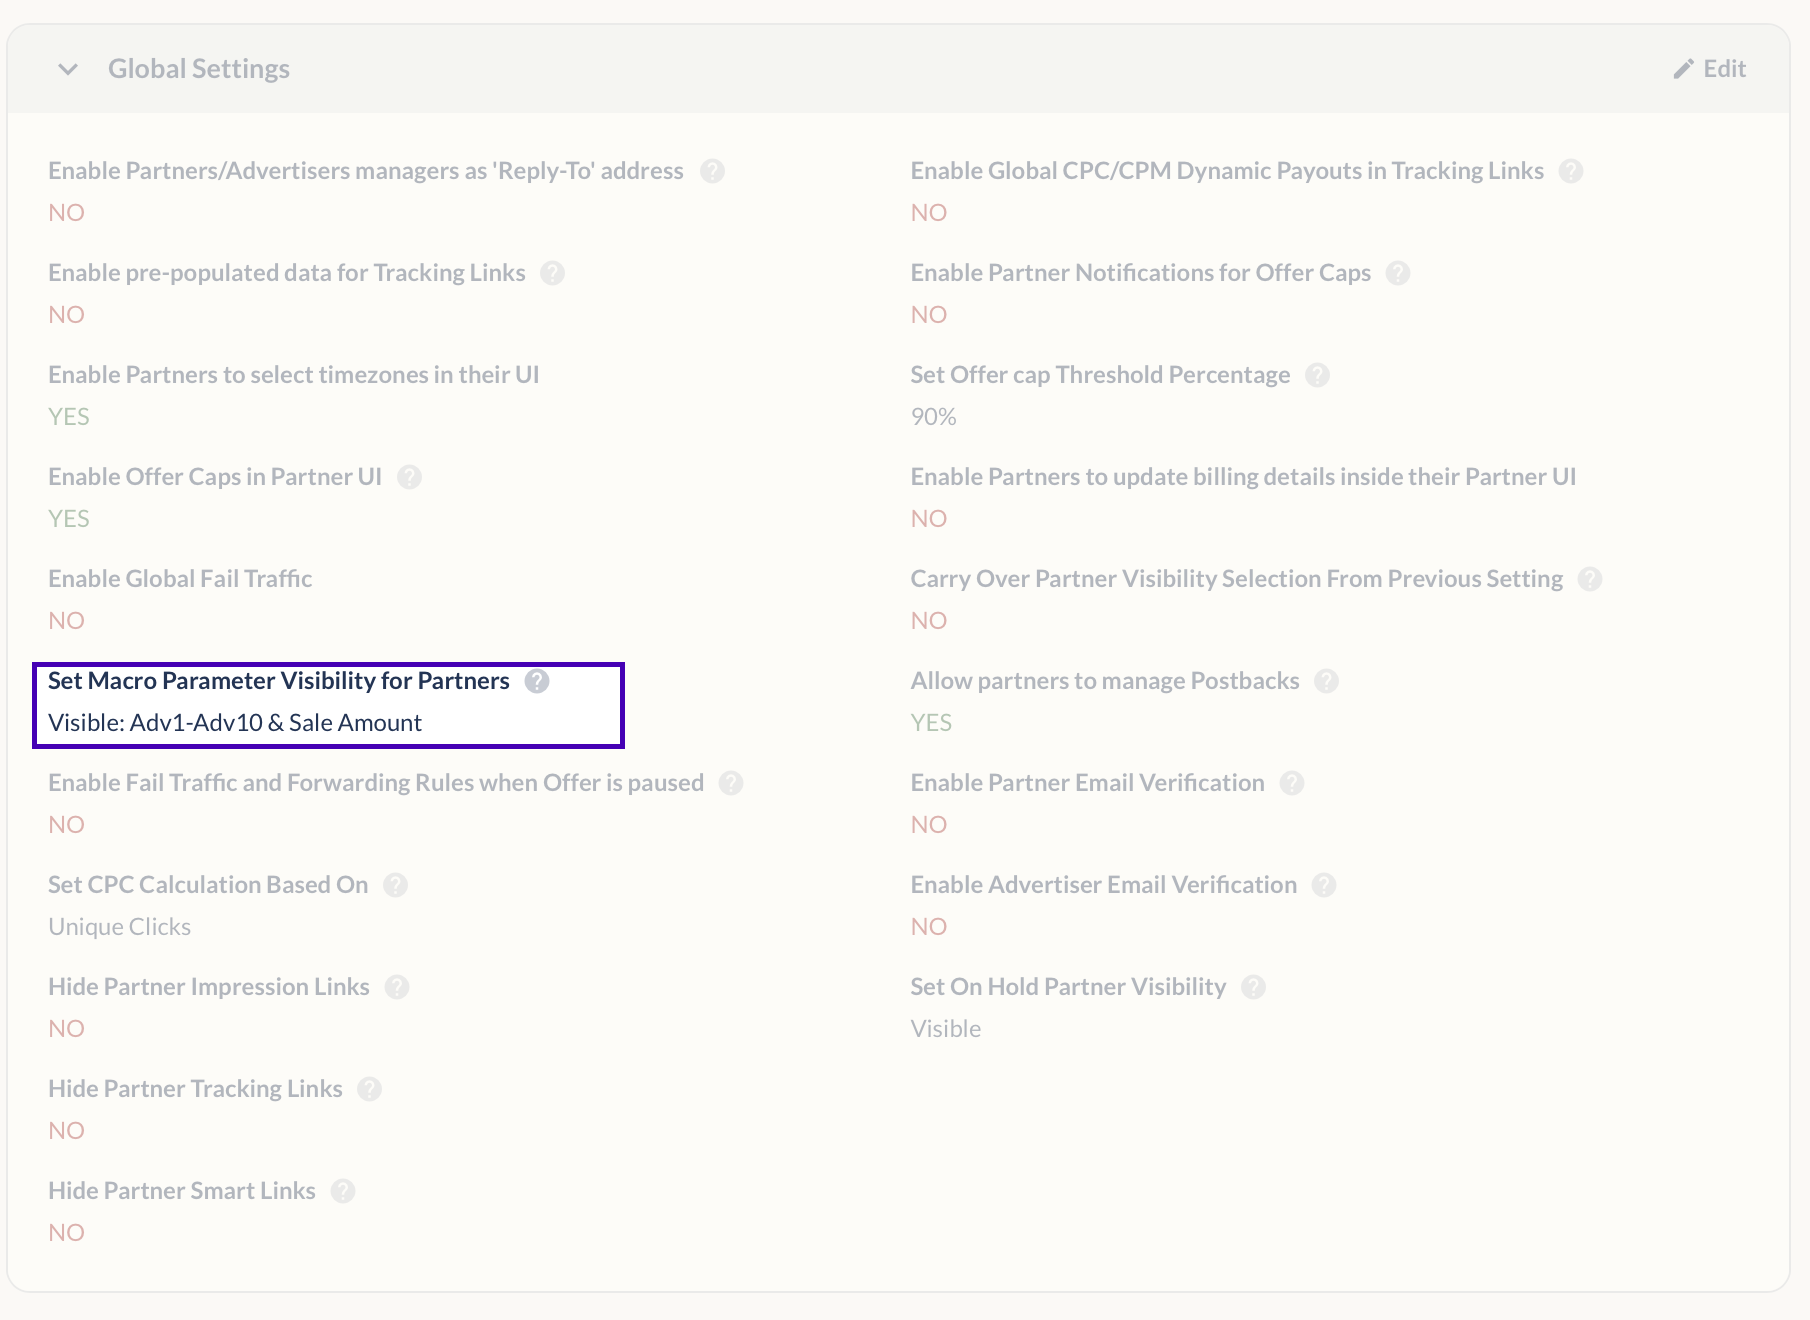
Meta receives your conversions through a Partner postback, so it can only be sent the advertiser parameters your Partners are allowed to see. By default adv1-adv10 and Sale Amount are hidden from every Partner, which means those fields arrive empty in the CAPI payload even when the offer is passing them correctly. Open them up in one of two places.
1
Open them for the Meta Partner only (recommended)
Go to
Partners → Manage
and open your Meta Partner.
Scroll to
Set Macro Parameter Visibility
and choose
Custom
.
Toggle on only the fields your Meta postback actually reads, then save.
The Partner-level setting beats the global one, so this exposes the data to Meta without changing anything for your other Partners.
2
Or set the global default
Go to
Control Center → Platform Configurations → Global
and click
Edit
.
Find
Set Macro Parameter Visibility for Partners
, set it to
Visible
, and toggle on the fields you want exposed.
This applies to every Partner on the network, not just Meta.

Control Center Global Settings with Set Macro Parameter Visibility for Partners highlighted, showing Visible: Adv1-Adv10 and Sale Amount

This makes the fields visible to the Partner, not only to Meta's API
Once a field is visible, that Partner can also add it as a column in their own Conversion Report under Reporting → Conversion. If your adv parameters carry internal payout logic or customer PII, use the Partner-level Custom option and enable only what Meta needs.

Full detail on both settings, including what Partners see on their side, is in Managing Offer Visibility & Partner Access.

Optimization Strategy

Daily Monitoring

  1. Check Partner Report for ROAS performance
  2. Identify campaigns spending money with poor returns
  3. Pause underperformers immediately
  4. Increase budgets on high-ROAS campaigns

Weekly Analysis

  1. Run Dimensional Analytics to find winning combinations
  2. Create new campaigns using best-performing elements
  3. Test new landing pages with proven creatives
  4. Review full funnel event performance

Scaling Winners

When you find a campaign with strong ROAS (3:1 or better):

  1. Increase daily budget gradually (20-50% increases)
  2. Create similar campaigns with slight variations
  3. Test the winning creative on different landing pages
  4. Expand to similar audiences in Meta

Troubleshooting

If conversions aren't showing up in Meta:

  1. Missing fbclid: Verify the fbclid appears in your click redirect URL
  2. Wrong Event Source URL: Double-check the URL in your postback configuration
  3. Incomplete postback: Ensure all required fields are filled
  4. Poor match quality: Add more user data fields (email, phone, etc.)

Debug Your Setup

Go to
Reporting → Partner Postback Report
Run the report for your
Meta partner
Click the
on any row
Select
View Debug Info
to see detailed error information

For Meta-specific error codes, check Meta's developer documentation - [Click Here]

Note
Event Source URL can only be edited by the network (not partners)
YouTube Ads: Tracking template updates don't work with YouTube campaigns - you'll need to manually add tracking parameters
Direct Linking: If using tracking templates, you don't need to manually add Everflow tracking links to your Meta ads
Processing Time: While conversions are sent in real-time, Meta may take up to 4 hours to process offline conversions

FAQ

Will Everflow track conversions accurately even if Meta's reporting shows different numbers?
Yes. Everflow tracks conversions through first-party cookies and direct server calls with high accuracy. We also have backup systems that record conversions even if users delete cookies. Our transparent reporting shows exactly how each conversion was attributed.
How quickly will I see improvements in Meta performance?
Most users see improved campaign performance within 24-48 hours as Meta's algorithm receives better conversion data. Full optimization typically occurs within 7-14 days of consistent data flow.
Can I track multiple offers with the same Meta integration?
Yes, but set up separate postbacks for each offer to maintain clean attribution and easier performance analysis.

Tracking Multiple Meta Ad Accounts & Ad Sets

If you run ads to the same offer from multiple Meta (Facebook) business accounts, you may want to see exactly which ad set and ad drove each user so you can optimize placements accordingly.

Meta supports dynamic parameters that pass the ad set and ad identifiers on the click. Append them to your partner tracking link in Meta:

Add
&sub1={{adset.id}}&sub2={{ad.id}}
to the partner tracking link used in Meta
Meta replaces these dynamic values automatically, so the ad set ID lands in Sub ID 1 and the ad ID lands in Sub ID 2 on each click
Run a
Analytics → Flex Report
filtered by your Meta partner to break performance down by ad set and ad

Restricted Events in Protected Categories

Meta restricts certain events from being tracked back to Meta for privacy reasons. This applies to events in protected categories — for example, health and wellness — and starting in 2025 Meta limited access to some of these standard events.

To keep sending conversion data while respecting these restrictions, the recommended approach is to transition the affected events to a custom event naming scheme. This change applies only to events delivered to Meta — the event names in your Everflow dashboard and other ad platforms are unaffected. A common mapping is:

Standard Meta Event
Custom Event Name
LandingPage
TO_01
AddToCart
TO_02
InitiateCheckout
TO_03
AddPaymentInfo
TO_04
Purchase
TO_05
Note
If you have event verification enabled on your ad account, you may need to approve these custom events in Meta Ads Manager before they are allowed to be sent. Check your individual accounts to ensure the events you use are permitted to flow freely.
Next in This Series