Overview
The Postback Testing Tool in Everflow helps you confirm that your Partner’s postback is firing correctly and includes the right data. This ensures your integrations are properly set up before launching traffic.
sub1–sub10 macro range. Use {sub6}–{sub10} and {adv6}–{adv10} in your postback URL exactly as you would the lower-numbered slots.sub1, source_id, clickid). Copy that value.adv5 field.
Validate Your Postback URL
Step-by-Step Guide: Testing a Partner Postback

Troubleshooting Common Issues
What it means: Everflow couldn't record the initial click needed to trigger a test conversion.
Check these settings on the Offer:
✅ Duplicate Click Filter — Disable temporarily for testing (Settings → Traffic Filters)
✅ Proxy Blocking — Your VPN or company network may be flagged as a proxy
✅ Forwarding Rules — If enabled, traffic may be redirected away from the test Offer
✅ Fail Traffic — Check if this is enabled and blocking clicks
✅ Smart Link Test — The test tool doesn't support Smart Link IDs; test individual Offers instead
Related Error Codes:
• Code 21 — Duplicate Click (same user clicked recently)
• Code 23 — Proxy Block (IP flagged as proxy/VPN)
• Code 1018 — Anura Fraud Check rejection
What it means: The click was recorded, but the postback itself failed validation.
Check these settings:
✅ Parameter Mapping — Ensure the Partner's click ID parameter matches your postback macro
Example: If Partner sends sub2=CLICKID, your postback must use {sub2}
✅ Min Click-to-Conversion Time — Disable or set to 0 seconds during testing
✅ Verification Token — If enabled, ensure the token in your postback matches the Advertiser's settings
✅ Anti-Fraud Tools — Temporarily disable Anura or similar integrations for testing
Related Error Codes:
• Code 12 — Invalid Transaction ID (ID not found or expired)
• Code 21 — Invalid Verification Token
• Code 26 — Postback Control rejection
What it means: Everflow fired the postback successfully, but the Partner's system didn't record it.
Troubleshooting steps:
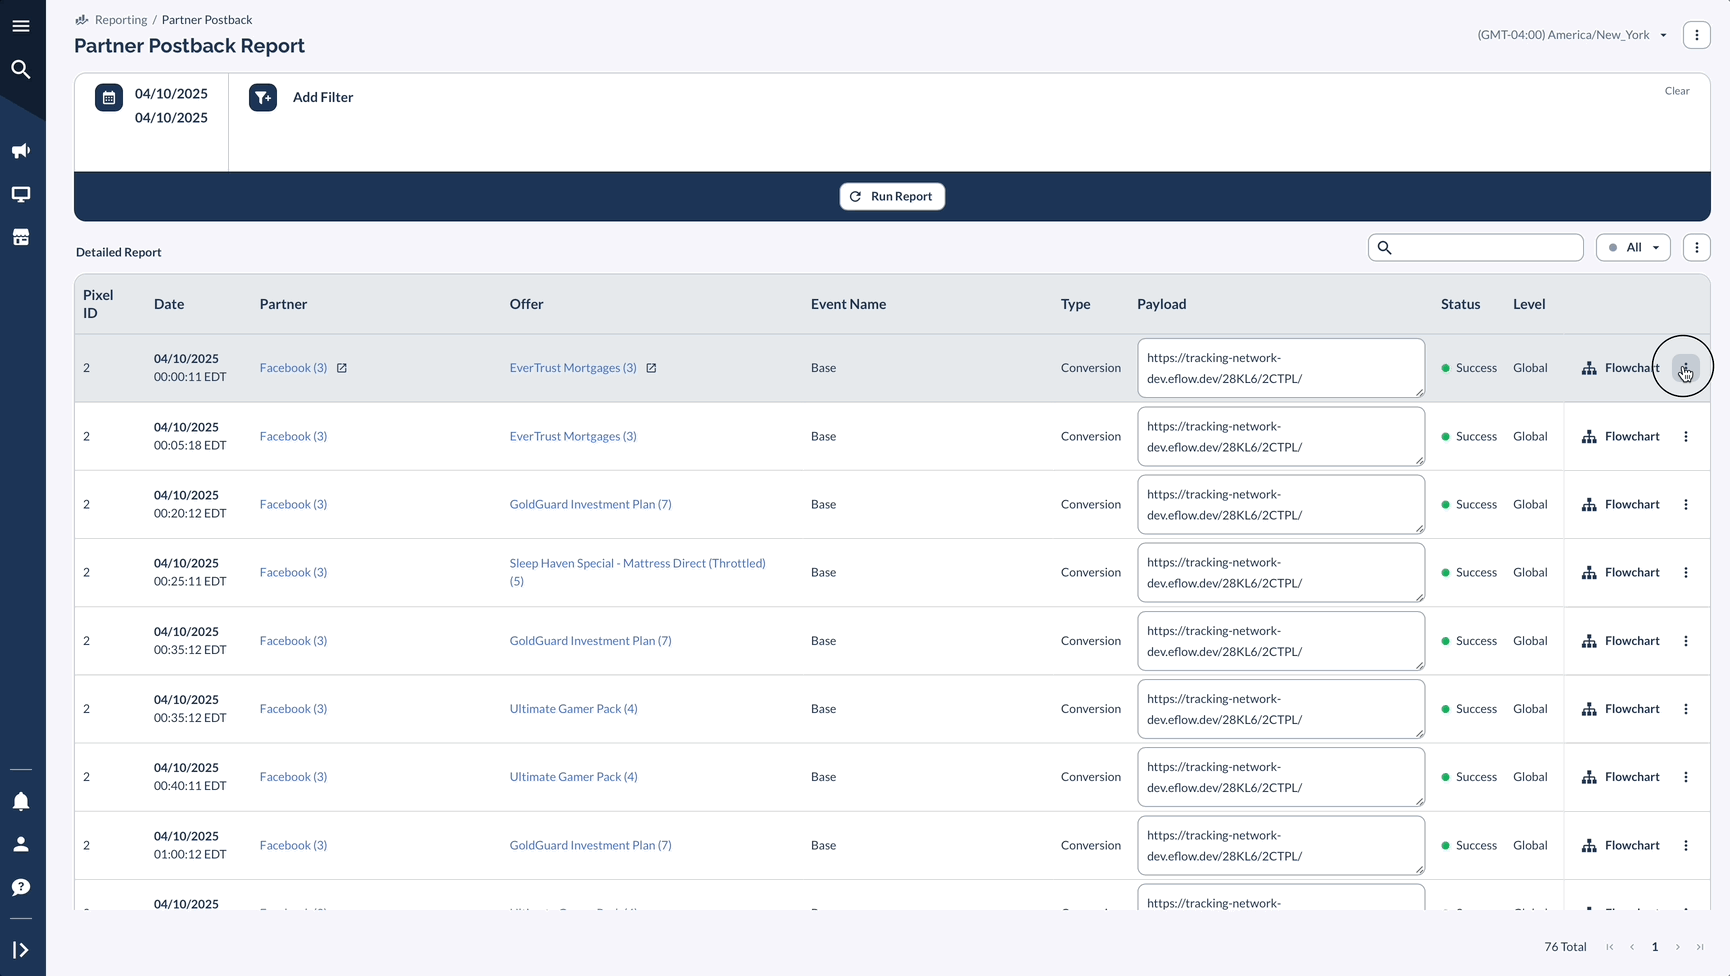
✅ Check Partner Postback Report — Go to Reporting → Partner Postback to see the response code
✅ Response Code 200 — Partner received it; issue is on their end
✅ Response Code 4xx/5xx — Partner's endpoint is rejecting or erroring
✅ Use Debug Info — Click the ⋮ menu on any row and select "View Debug Info" to see full request/response
Common Partner-Side Issues:
• Partner's server is blocking Everflow IPs (share our Server IP list)
• Partner expects POST but Everflow sends GET (most postbacks are GET)
• Parameter name mismatch (they expect "clickid" but you're sending "click_id")
What it means: Your browser is blocking the test tool's popup window.
Quick fixes:
✅ Allow Pop-ups — Click the blocked popup icon in your browser's address bar and allow for Everflow
✅ Disable Ad-blocker — Extensions like AdBlock or uBlock can interfere with the test script
✅ Turn off VPN — Some VPNs block JavaScript execution or modify requests
✅ Try Incognito/Private Mode — Opens a clean browser session without extensions
✅ Check Firewall — Corporate firewalls may block .js files from loading
What it means: The conversion was recorded but credited to a different Partner than expected.
Common causes:
✅ Email Attribution — If you reused the same test email, a previous Partner may have "claimed" that email
Fix: Use a unique email for each test (e.g., test+partner1@example.com)
✅ Cookie from Previous Test — Clear your browser cookies between tests or use Incognito mode
✅ Lead-First Requirement — For integrations using Email Attribution (Zoho, Stripe), the lead event must fire before the conversion
• Click Error Code Reference →
• Conversion Error Code Reference →
Meta (Facebook) CAPI Postback Debugging
If you're using Meta’s Conversions API (CAPI), and something seems off:
Run a Partner Postback Report: