Home
Partner Management
Partner Setup
How To Customize The Partner Platform

SERIES:

How To Customize The Partner Platform

Learn how to tailor Partner Platform for your Partners, including dashboard layout, metrics visibility, and custom content to create an optimized experience for your Partners while maintaining control over what information they can access.

Overview

A well-organized Partner dashboard is crucial for Partner success and program efficiency. By customizing the dashboard, you can control what information Partners see, how it's presented, and even add personalized content to enhance their experience.

This guide will walk you through all available customization options, from basic layout adjustments to advanced personalization using custom HTML cards.

Key Terms Check out these terms before reading this guide: ➔ Partner UI: The interface Partners use to access your program's offers and track their performance.
➔ Dashboard Cards: Individual sections on the dashboard that display specific metrics or tools.
➔ Custom Card: A flexible HTML-based card for displaying custom content and announcements (for example, you can choose to display a default Partner tracking link for a specific Offer or show the client account manager info to the partners).
➔ Macros: Dynamic placeholders that automatically populate with Partner-specific information.
➔ Partner Dashboard Customization: The interface through which you manage the dashboard layout and visibility.

Understanding Dashboard Components

Available Dashboard Cards

  • Metrics: Shows key performance indicators
    • Clicks: Shows the total clicks tracked through the Partner's Everflow Tracking Links
    • Conversions: Shows successful Base Conversions attributed to the Partner
    • CVR (Conversion Rate): Shows the percentage of Conversions per Clicks
    • Events: Shows additional actions tracked before or after the initial Base Conversion
    • EVR (Event Rate): Shows the average number of Events per unique Conversion
    • Impressions: Shows the total Impressions for all Offers the Partner is running
    • Redirect Traffic Revenue: Shows an overview of revenue earned from redirected traffic
    • Revenue: Shows an overview of gross revenue reported to Everflow for the Partner
  • Performance: Compares metrics over time
  • Offers: Lists available promotional opportunities
  • Custom Card: Space for your personalized content
  • Tracking & Asset Generator: Tools for creating promotional materials (usually links)

Customizing The Dashboard Layout

Configure the layout and visibility of cards on the partner dashboard.

Basic Customization

Navigate to Control Center > Partner Configurations Select the General tab Find the Partner Dashboard Customization card Click Edit

Managing Card Visibility

  • Use the toggle button in the upper right to show/hide specific cards
  • All changes affect all Partner dashboards
  • Partners can't override your visibility settings

Adjusting Card Layout

Resize Cards: Click and drag card edges Reposition Cards: Click and drag card headers Save Changes: Click Save Dashboard to apply updates

Creating Custom Content

So, you want to add and personalize content to your Partner Platform? You can do this with a custom card. Think of it as a blank canvas where you can place important information for all your partners to see.

A Custom Card is a feature of the Partner Platform that allows you to display personalized content, like a welcome message or a showcase of offers, to all your partners. It's a great tool for sharing news that applies to everyone, since it cannot be segmented to a specific audience.

The Problem

Maria, an agency owner, just launched a new program and wants to make a great first impression. She needs to create a welcoming and informative message for all her new partners, but she's not a developer. She needs a way to create a clean, professional-looking message without writing a single line of code.

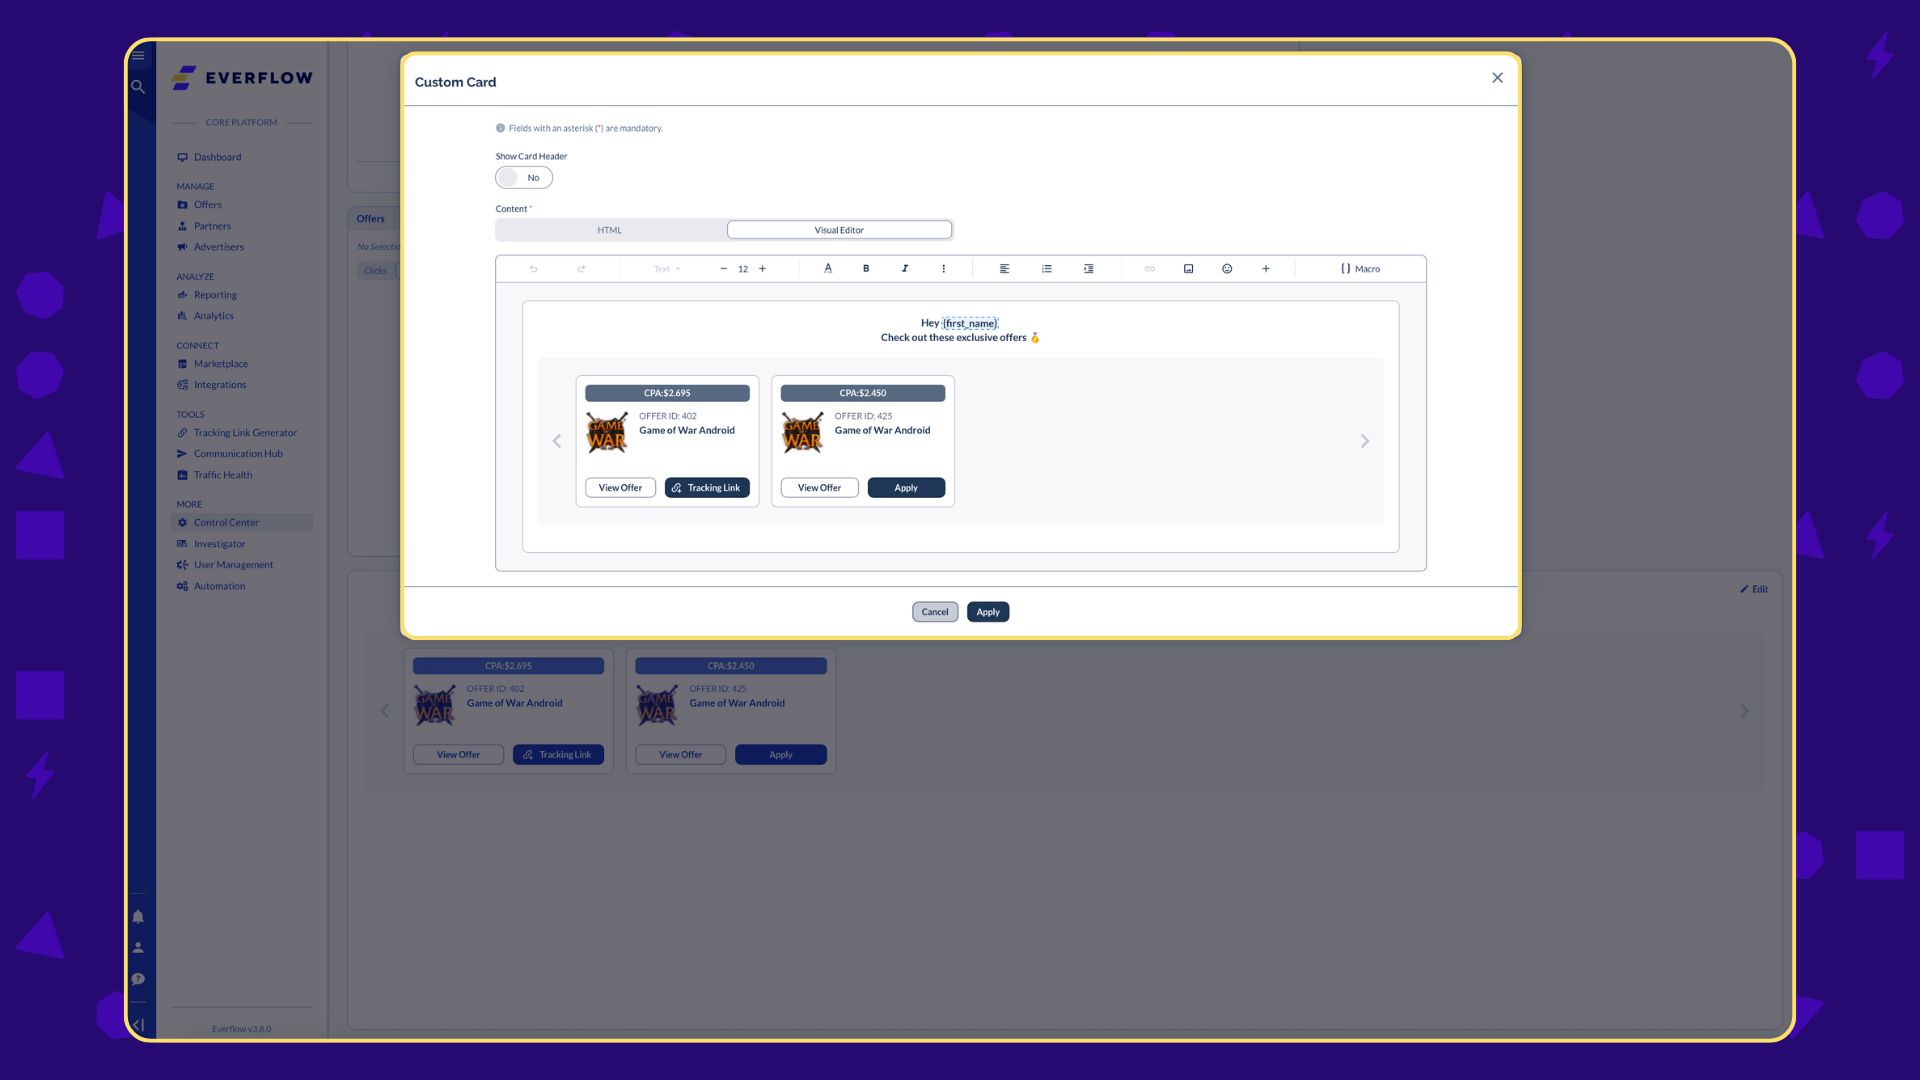
The Solution: The Visual Editor

The old custom card required HTML, which was a barrier for many users. The new visual editor makes it simple for anyone to create engaging content. Let's walk through how Maria can use the visual editor to welcome her partners and highlight some new offers.

Navigate to Control Center > Partner Configurations > Partner Dashboard. In the Partner Portal Dashboard section, click Edit and then the Customize Cards icon. In the pop-up, locate the Custom Card and enable it with the toggle button. Once the card is enabled on your dashboard, click Edit on the Custom Card. Select the Visual Editor tab. This is where the magic happens. You can use the editor's tools to add text, change fonts, and insert elements like buttons and images.

Available Content Elements

The Visual Editor provides a range of tools to help you build your custom content without any code.

Element Description Layouts Choose from one, two, three, or four-column layouts to structure your content. Text & Formatting Add text and format it with bolding, italics, underlines, and different colors. Buttons & Links Insert a clickable button with custom text and a link. Images & Videos Easily embed images, YouTube videos, and iframes directly into the card. Offer Showcase A powerful feature that allows you to select specific offers to display to all partners. Offers will only be visible to a partner if they have access to them. Macros Personalize your message with macros that will automatically fill in dynamic information about the user, their account manager, and more.

Macros are powerful placeholders that automatically fill in personalized information, such as a partner's first name or their account manager's email. Using macros allows you to create a single message template that feels unique and personal to every recipient.

Account Manager Related Macros {account_manager_email} - Email address of the Partner's assigned account manager {account_manager_first_name} - First name of the Partner's account manager {account_manager_last_name} - Last name of the Partner's account manager {account_manager_im_identifier} - Instant messaging identifier for the account manager {account_manager_im_software} - The instant messaging platform used by the account manager Partner Related Macros {affiliate_id} - The unique identifier assigned to the Partner {affiliate_referral_url} - The Partner's referral URL for tracking purposes {email} - The Partner's registered email address {first_name} - The Partner's first name {last_name} - The Partner's last name {user_id} - Partner's unique user ID in the system {encoded_value} - A system-generated encoded value for secure data transmission

Real-Life Examples

Here are a few ways you can use the Custom Card to communicate with your partners.

The "Welcome Aboard" Message

Maria wants to greet her new partners personally. Using the visual editor, she can add a welcome message and include macros like {first_name} and {account_manager_first_name} to make it feel special. This is the perfect place to set the tone for the partnership and provide contact information for the team.

The "Featured Offers" Card

Since the custom card can also display an Offer Showcase, Maria can use it to highlight a few top offers. This is an excellent way to direct partners to offers you want them to focus on. When a partner sees the card, they can click on it to see the offer's details and grab their tracking link. Keep in mind, offers will only be visible if the partner has access to them.

Custom Cards vs. Banners

While they may seem similar, custom cards and banners have key differences. Knowing which one to use is crucial for effective communication.

Audience A Custom Card is visible to all partners on the dashboard. It cannot be scheduled or targeted to a specific audience. A Banner allows you to schedule its display and target a specific audience based on a wide range of criteria, such as their performance, location, or login activity. Placement The Custom Card can be moved and placed anywhere on the partner's dashboard. A Banner will always appear at the top of the dashboard. If you have multiple banners, they will be displayed in a carousel format, with the most recent banner or a high-priority banner appearing first. Functionality While a custom card can showcase offers, it lacks the full functionality of the banner, which can schedule a banner and include a read-more link. Pro Tip! Think of a Custom Card as a static notice board for all partners and a Banner as a targeted advertisement that you can schedule and personalize for a specific group.

Use a Custom Card for a universal welcome message or to share general news that applies to every partner. Use a Banner for time-sensitive promotions, to highlight offers to specific partners, or for targeted announcements.

Learn More About Partner Platform Banners ->