Home
Communication Hub & Alerts
Communication Hub
Creating General & Offer Messages

SERIES:

Getting Started With Communication Hub

Creating General & Offer Messages

Create and send two types of messages through the Communication Hub: General Messages for broad communications and Offer Details Messages for sharing specific offer information with Partners.

Overview

The new Communication Hub provides an integrated platform for Direct Messaging and Emailing with your Partners, Network Team, and Advertisers.  

Plus, you can send branded emails or share information about Offers your Partners can promote, all within a single convenient section.

Key Terms Review the list of Communication Hub terms below: ➔ General Message: Customizable email for any recipient type.
➔ Offer Details Message: Specialized email focused on offer information for Partners.
➔ Macro: Dynamic placeholder for populated personalized content.
➔ Theme: Pre-designed email layout (Blank/Logo/Branded).
➔ Audience Rule: Criteria for recipient selection.

Creating Email Messages

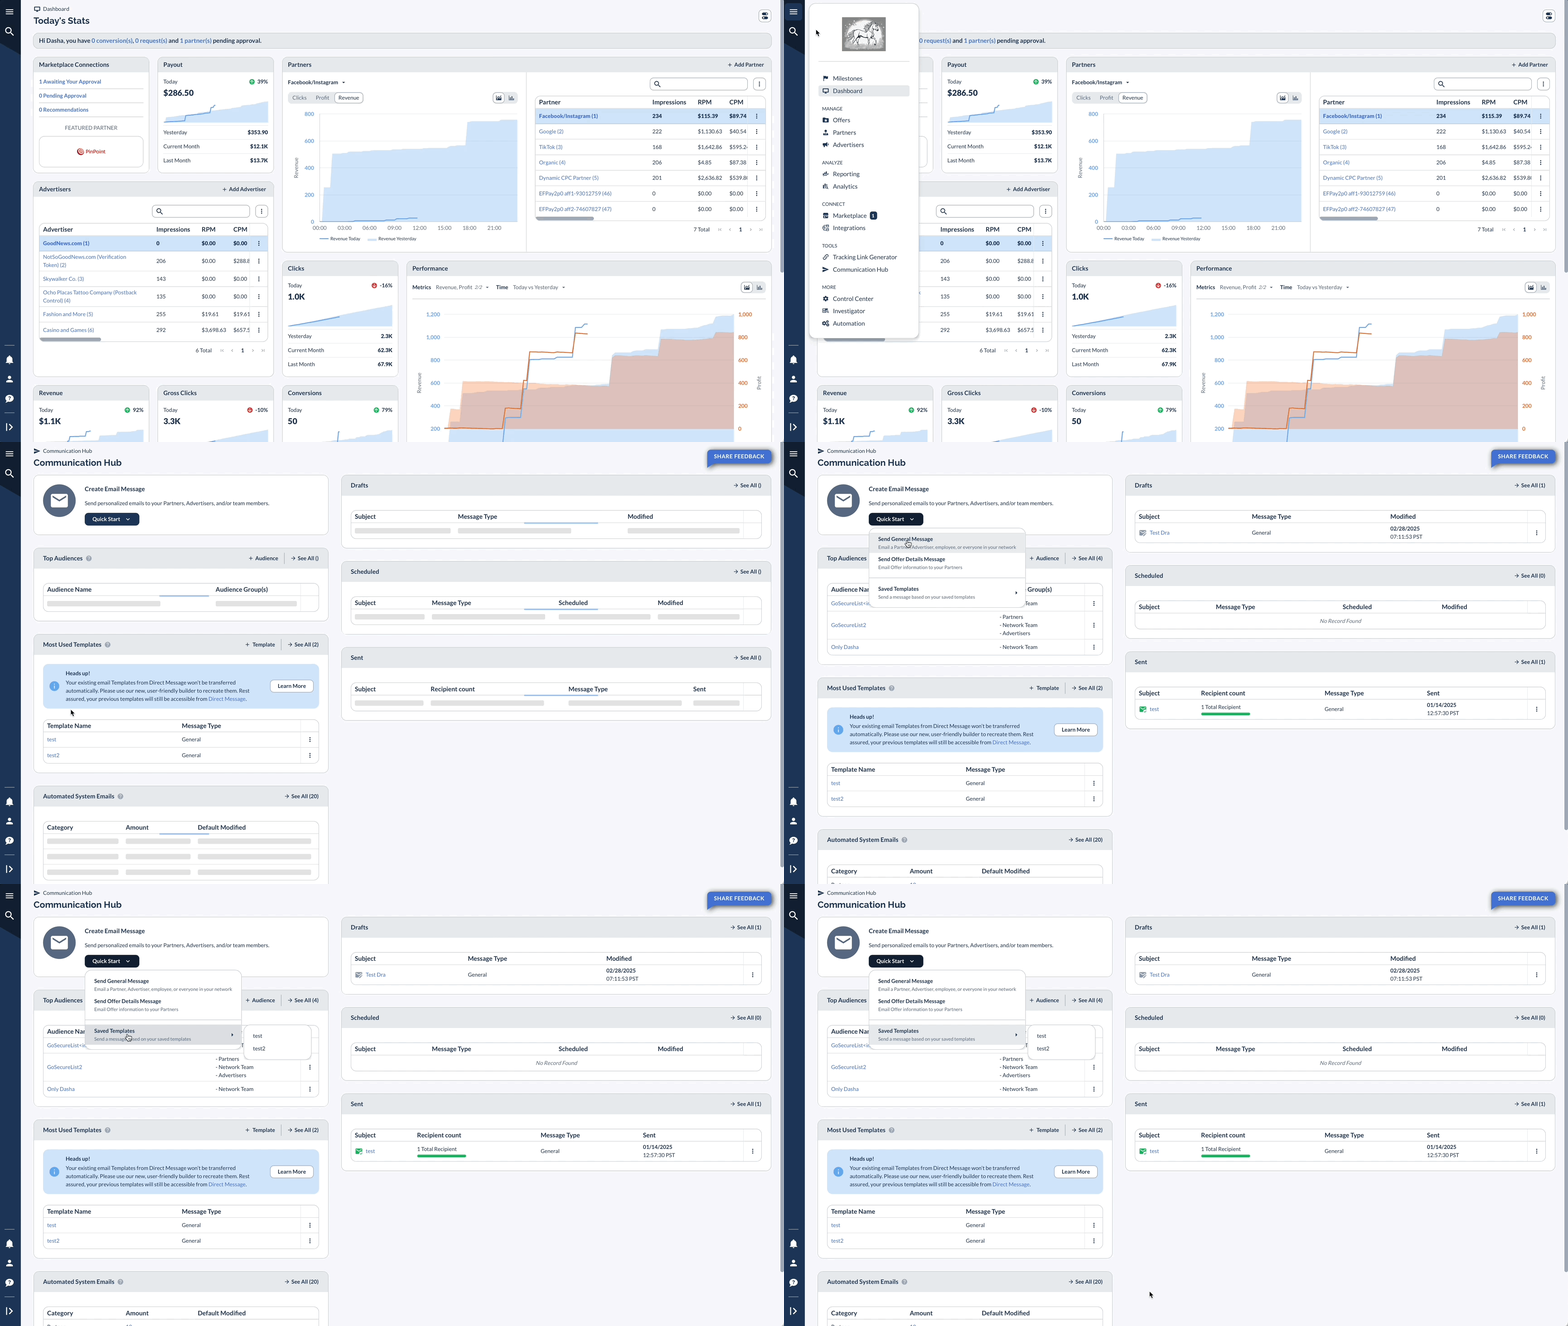
To access the Communication Hub, navigate to the left-hand menu and select Communication Hub under the Tools section.

The "Create Email Message" section allows you to:

  1. Send General Emails
    • Compose and send personalized emails to your Partners, Advertisers, or team members.
  2. Send Offer Details Emails
    • Share specific information about Offers with your Partners via email.
  3. Use Saved Templates
    • Send emails based on previously created and saved templates for consistency and efficiency.

Follow the steps below to learn how to send general emails, Offer detailed emails, or save templates for future use.
General Messages

Step 1: Send General Message

You can send a branded message (with your chosen Network logo at the top) or start from scratch (without the logo) with our different theme options.

But we’ll cover each customization option one by one.
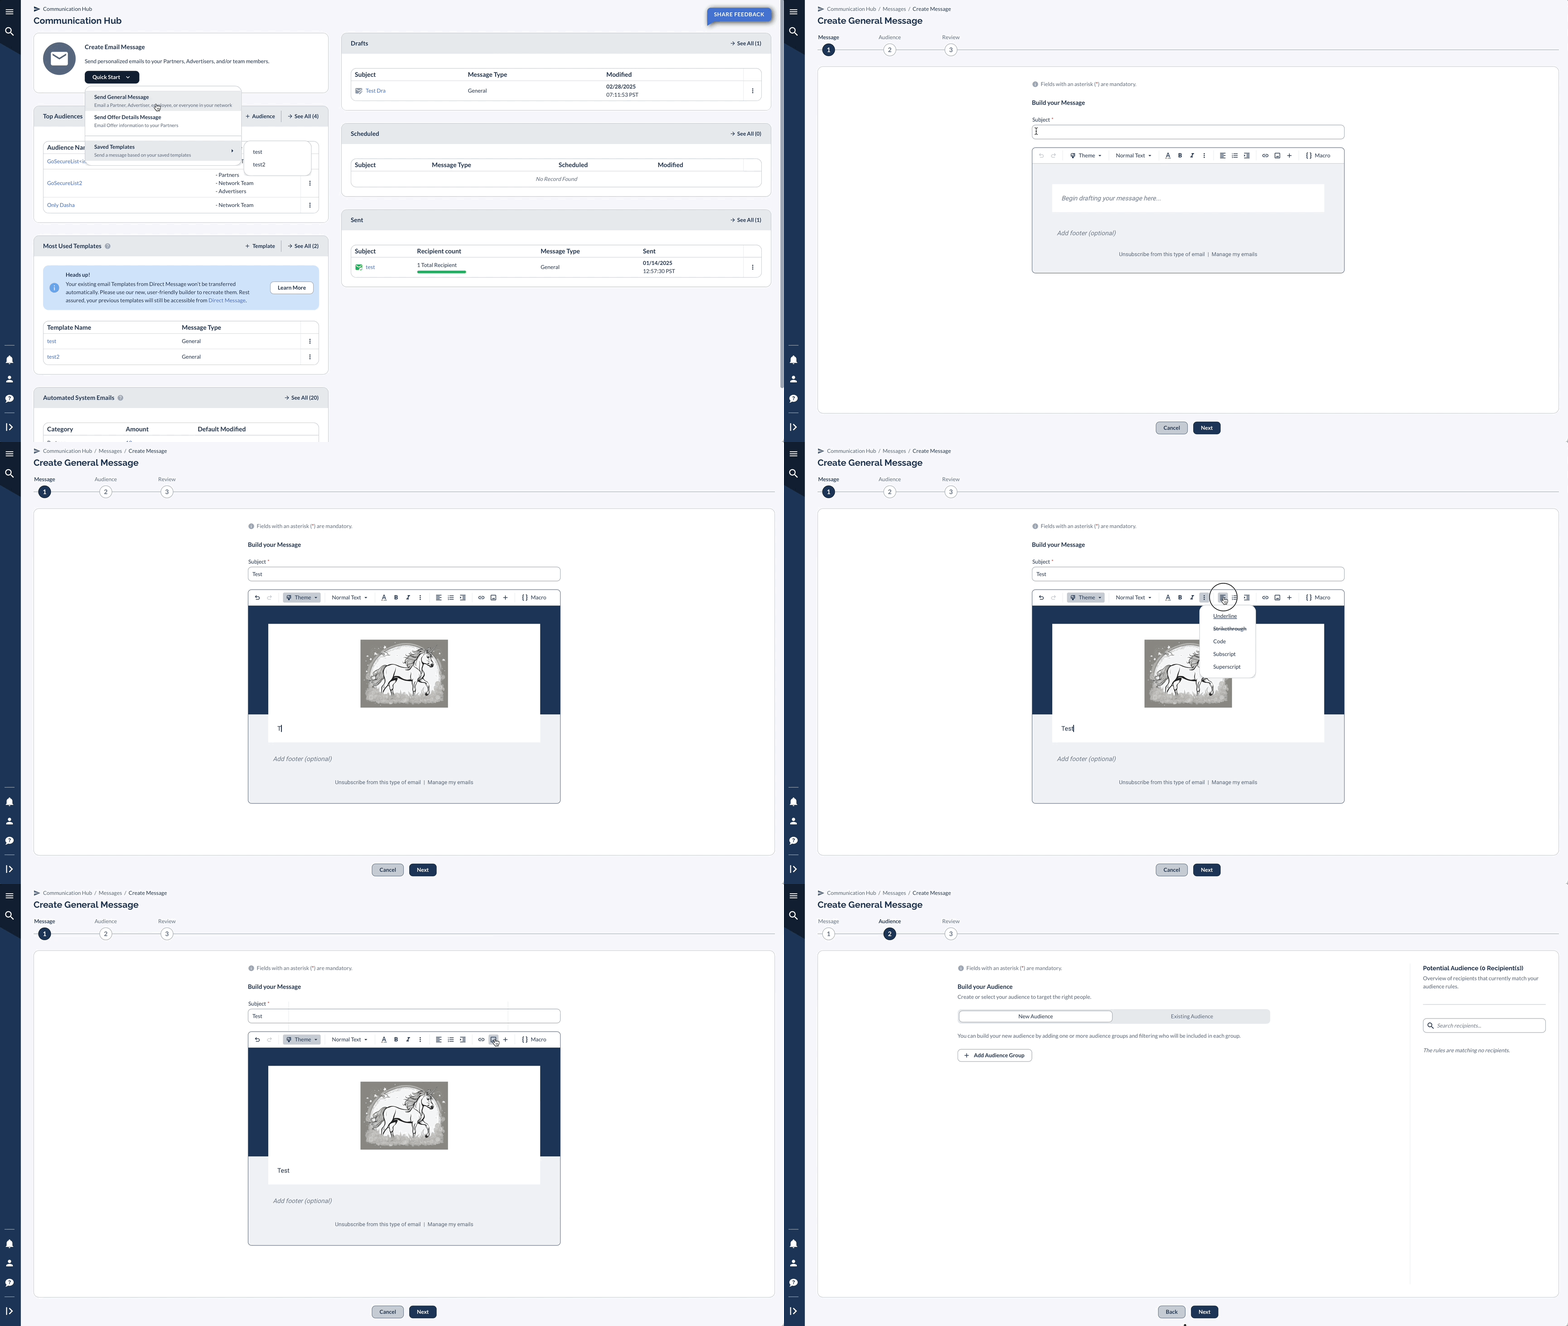
Fill out the following required fields:

  1. Subject
    • Enter the subject line for your email.
  2. Message
    • Customize content using available tools:
  • Undo & Redo Actions
  • Blank Theme, Logo Theme, or Branded Theme (your selected brand colors, etc.)
  • Format text as Heading 1, Normal text, Quote, Code Block, etc.
  • Change Text Color, Bold or Italicize text
  • Underline, Strikethrough, code, etc.
  • Align text
  • Create a list
  • Decrease / Increase Indent
  • Insert a Link, Image, Emoji, Button or Divider
  • Add Macros (Example: {first_name} - recipient first name.)
Quick Reminder The list of macros will differ depending on the recipient and the sender. Not all macros are available for your setup and selected Audience.
List of Macros {first_name}: This macro is replaced with the recipient's first name. {last_name}: This macro is replaced with the recipient's last name. {email}: This macro is replaced with the recipient's email address. {company}: This macro is replaced with the name of the network, Partner, or Advertiser. {advertiser_id}: This macro is replaced with the unique identifier of the Advertiser. {affiliate_id}: This macro is replaced with the unique identifier of the Partner. {affiliate_referral_url}: This macro is replaced with the referral URL provided by the Partner. {account_manager_first_name}: This macro is replaced with the first name of the account manager assigned to the recipient. {account_manager_last_name}: This macro is replaced with the last name of the account manager assigned to the recipient. {account_manager_email}: This macro is replaced with the email address of the account manager assigned to the recipient. {account_manager_im_software}: This macro is replaced with the name of the instant messaging software used by the account manager assigned to the recipient. {account_manager_im_identifier}: This macro is replaced with the account manager's identifier or username on the instant messaging software specified by {account_manager_im_software}. {website_url}: This macro is replaced with the URL of the company's website. {activation_link}: This macro is replaced with a unique activation link or URL that the recipient can use to activate their account or perform a specific action.

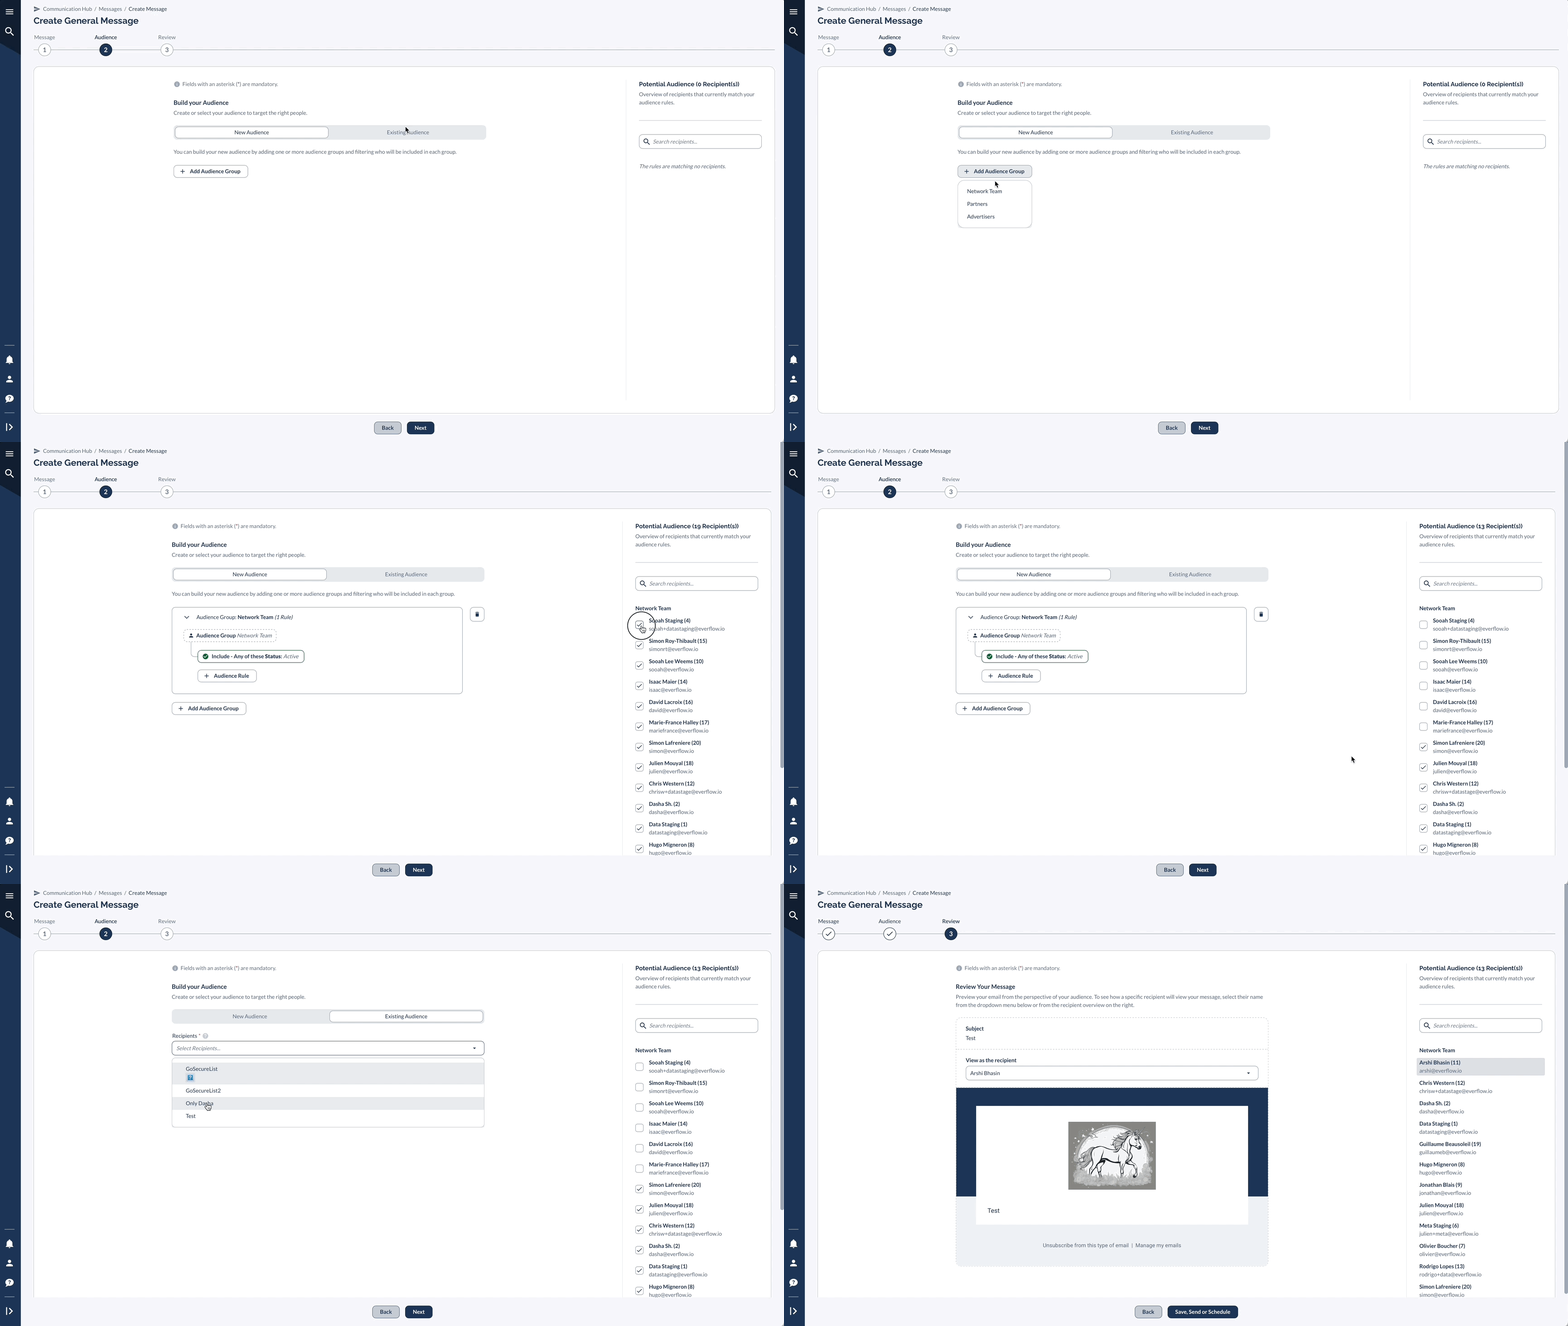
Step 2: Build your Audience

The audience list determines who will receive your email, based on the conditions you set. You can create a new audience or use an existing one. To build a new audience, click Add Audience Group and choose from the following options: Network Partner Advertiser After selecting your audience group, set up an Audience Rule to include or exclude recipients based on specific conditions. For example: All Created (within a specified time interval) From the following list (select one or more users to include or exclude) Has logged in between (specific time interval) Having any of the following roles (role-based filtering)

Find the Full List of Conditions Here

To segment the Audience, you can add Audience Rules and corresponding Conditions. Here, you can Include and Exclude various Audience Rule Conditions.

The following Conditions are available for each group:
Network Team Members All Created Between From the Following List Has Logged In Between Has Any of the Following Roles Partners All Can Run Traffic on All of These Offers Can Run Traffic on Any of These Offers Created Between Based on Reporting Data From the Following List Has Logged In Between Any of These Account Executives Any of These Billing Frequencies Any of These Labels Any of These Partner Managers Any of These Traffic Sources Status Is Set Up to Receive Payment Advertisers All Created Between From the Following List Has Logged In Between Has Any of These Account Managers Has Any of These Billing Frequencies Has Any of These Labels
When multiple rules are added to one group, the rules will have an AND operator, meaning that the recipients added to the list will need to match every rule within the group.The current recipient list is displayed in the right panel.

You can use this to search and verify that the correct people are set to receive the message based on the rules you've configured.‍

If multiple groups are added, each group has an OR operator, meaning that the recipients added to the list will include all emails that match any of the groups.

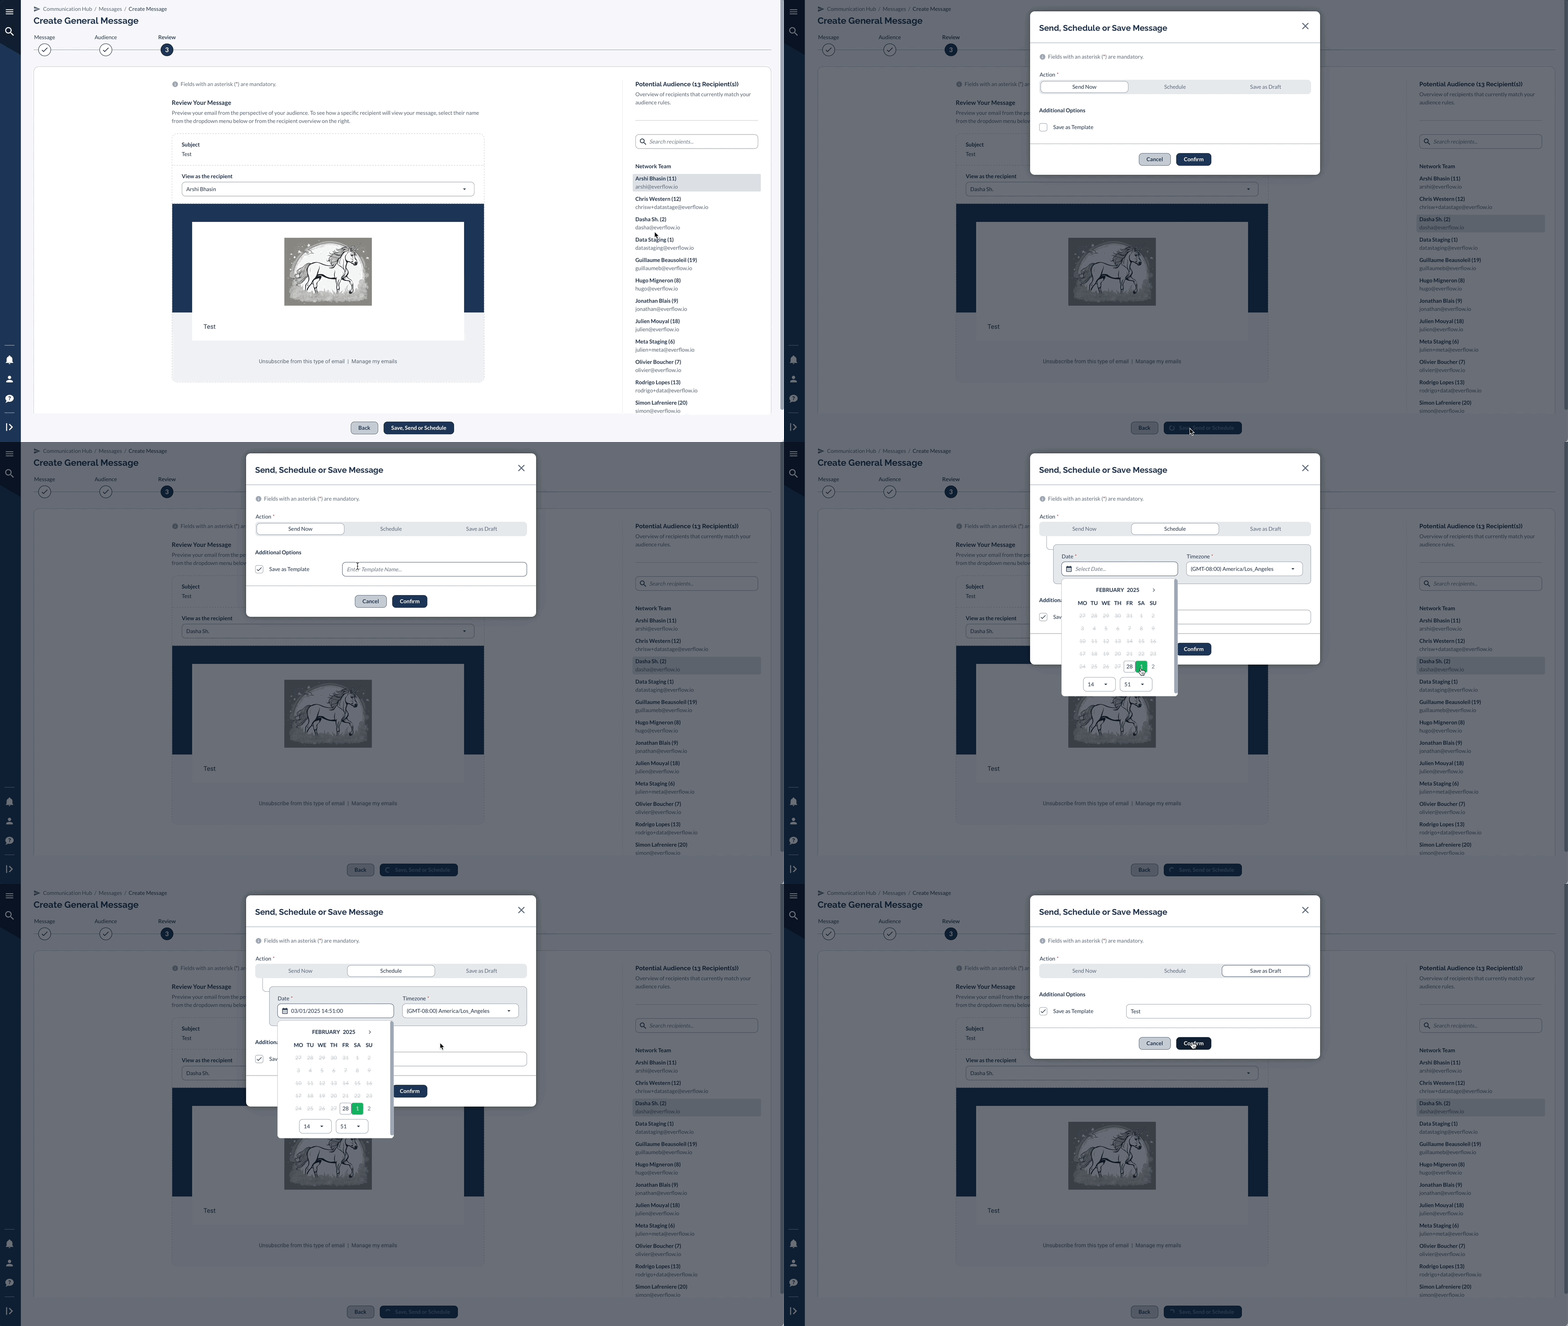
Step 3: Review and Send

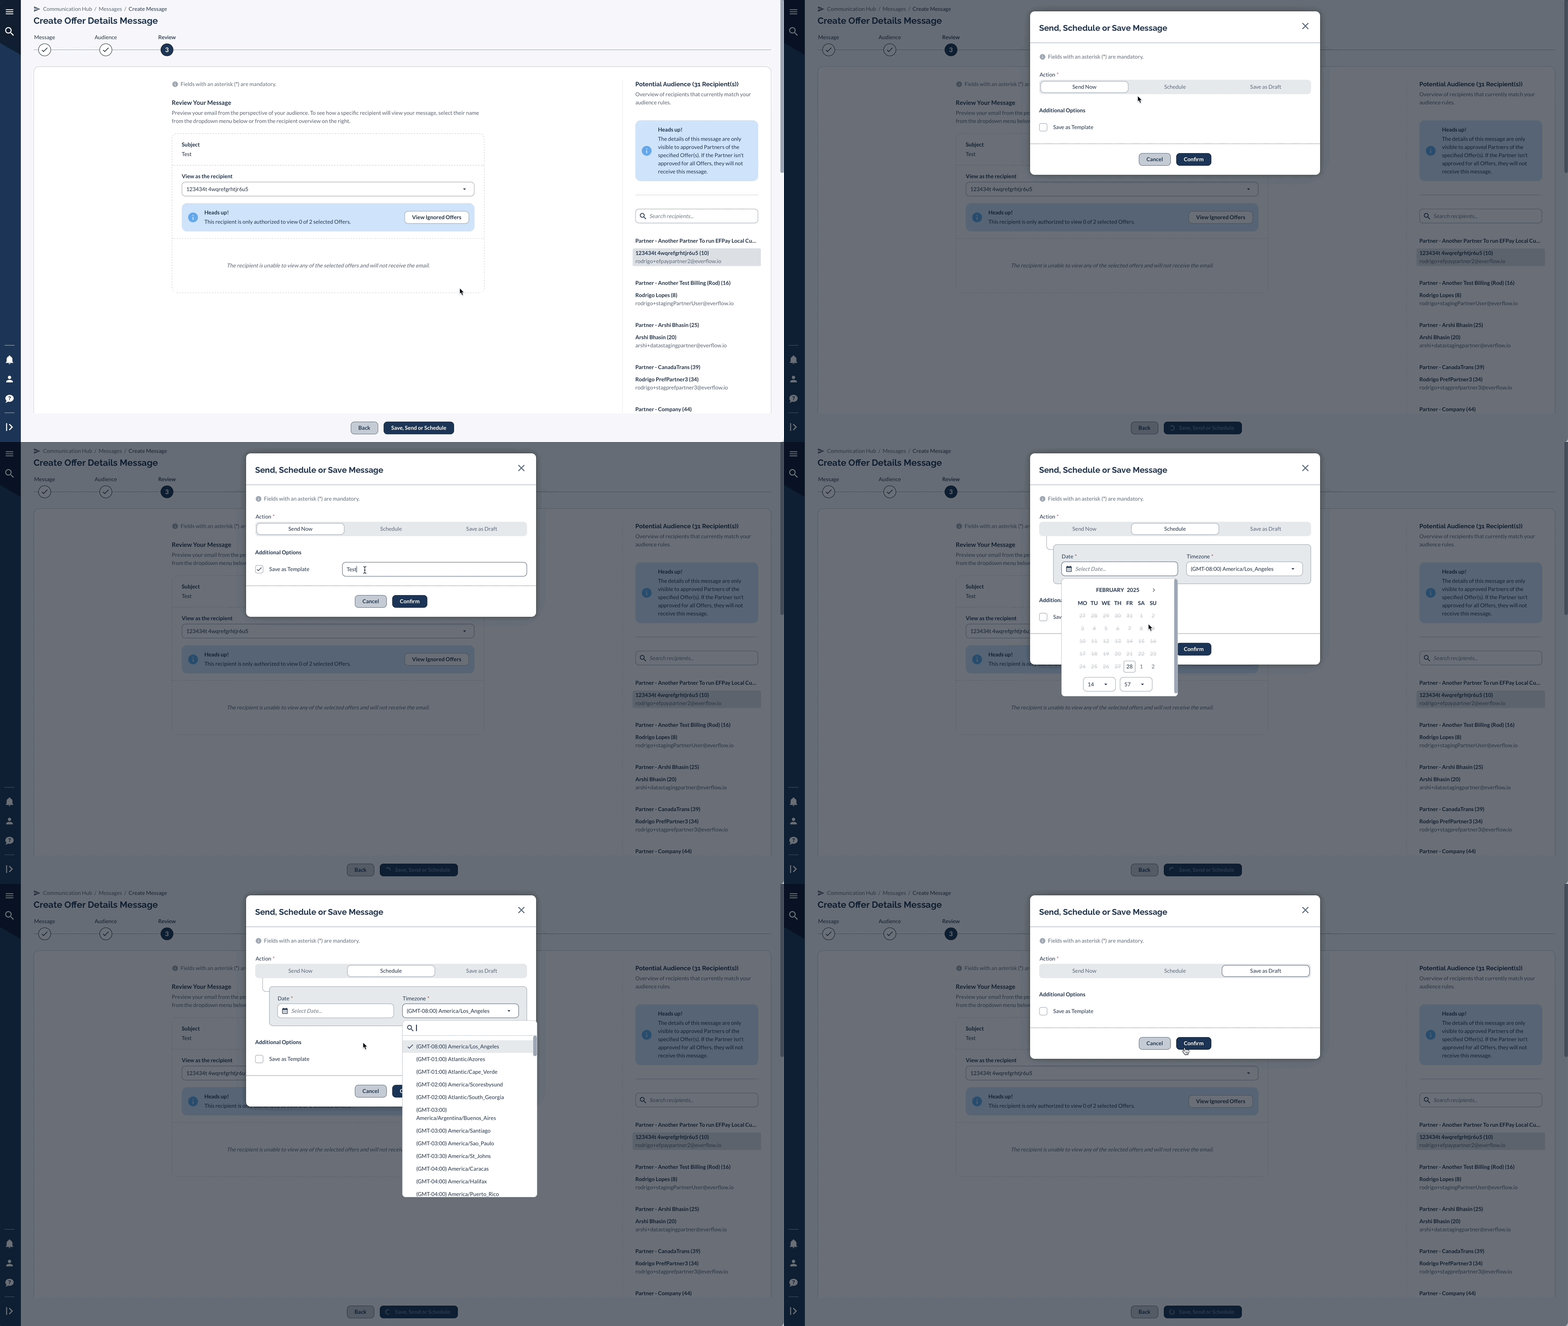
This step allows you to preview the content that each recipient will receive, as well as review your audience list. You can select individual recipients to see what they will receive. You can then choose to: Save the message as a draft. Send the message immediately. Schedule the message for a future date and time. Additional Options: Save Audience Rules: (enter a name to save the audience rule for future use) Save as Template: (enter a name to save the entire message as a template - this option, however, does NOT save the Audience Rules. Templates only save the actual message and the Subject Line) Schedule: Select the date and time zone for when you want the message to be sent. Same additional options as above (Save Audience Rules, Save as Template). Send Now: Send your message immediately. Same additional options as above (Save Audience Rules, Save as Template). To create an Audience without creating a message first: Navigate to Top Audiences. Click Audience to create a new rule, or See All to view your saved rules. From the three-dot menu next to an audience, you can: Send General Message (opens the "Create Email Message" window) Preview Recipients Edit the audience rule Export Recipients (CSV file) Delete the audience rule *Top Audiences - Audiences most used in the past 100 days.

Offer Details Message

You can include specific Offer information in your direct messages to Partners. Here's how:
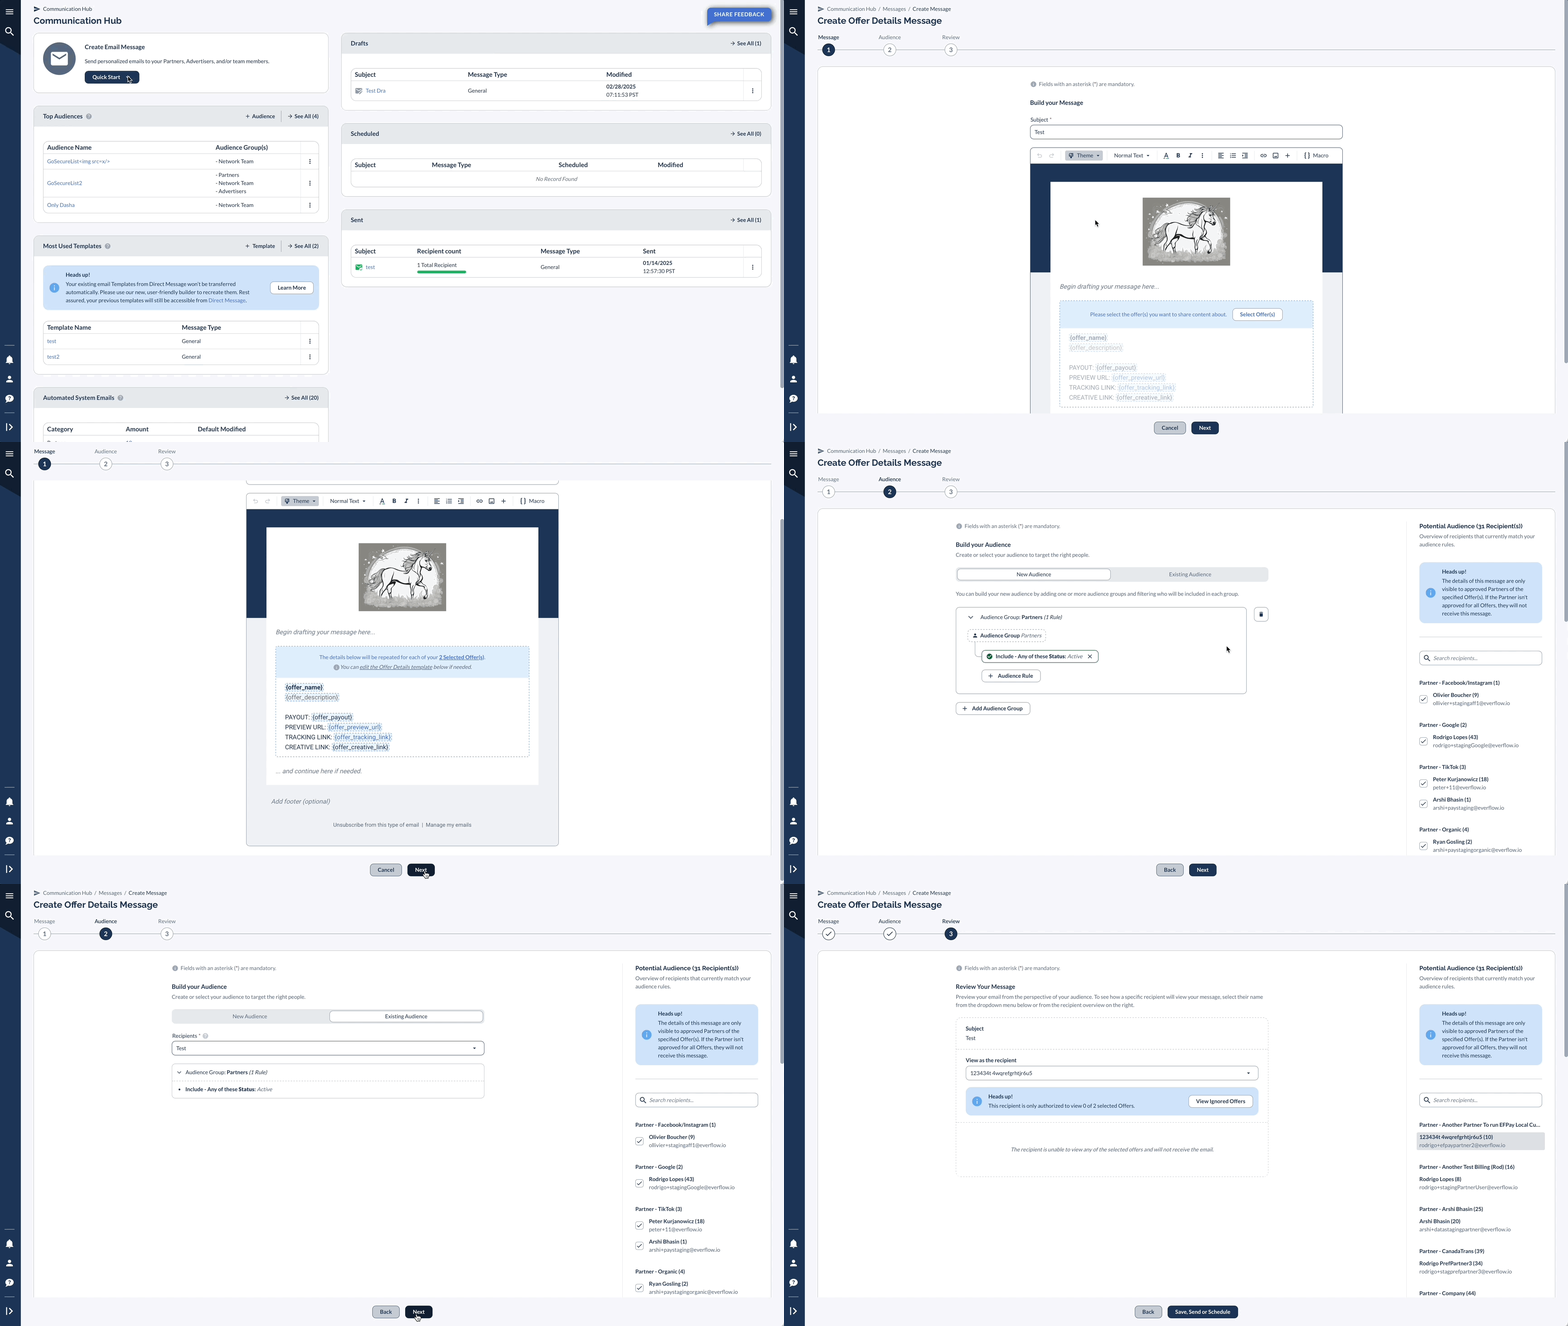
Navigate to Direct Messages > Offer Details and select the Share Offer option. Choose one or more Offers you want to share with your Partners, then click Next Select the recipients for your message. Recipients are the group of users who will receive the direct message containing the Offer details.
Heads Up! Offer details can only be sent to Partners in your selected Audience.
Create a custom Offer Content section by adding text, links, macros, and other custom elements. You can use macros like {offer_description}, {Offer_id}, and other Offer-related placeholders to dynamically insert an Offer. These details will be repeated for every Offer selected in previous steps. Enter a subject line and select a theme if you want to use one. Optionally, schedule the message for a specific date and time. Write the overall content for the message body, separate from the Offer Content section you created earlier. This will only appear once.

Once you've completed these steps, you can review and send your message containing the Offer details to the selected recipients.
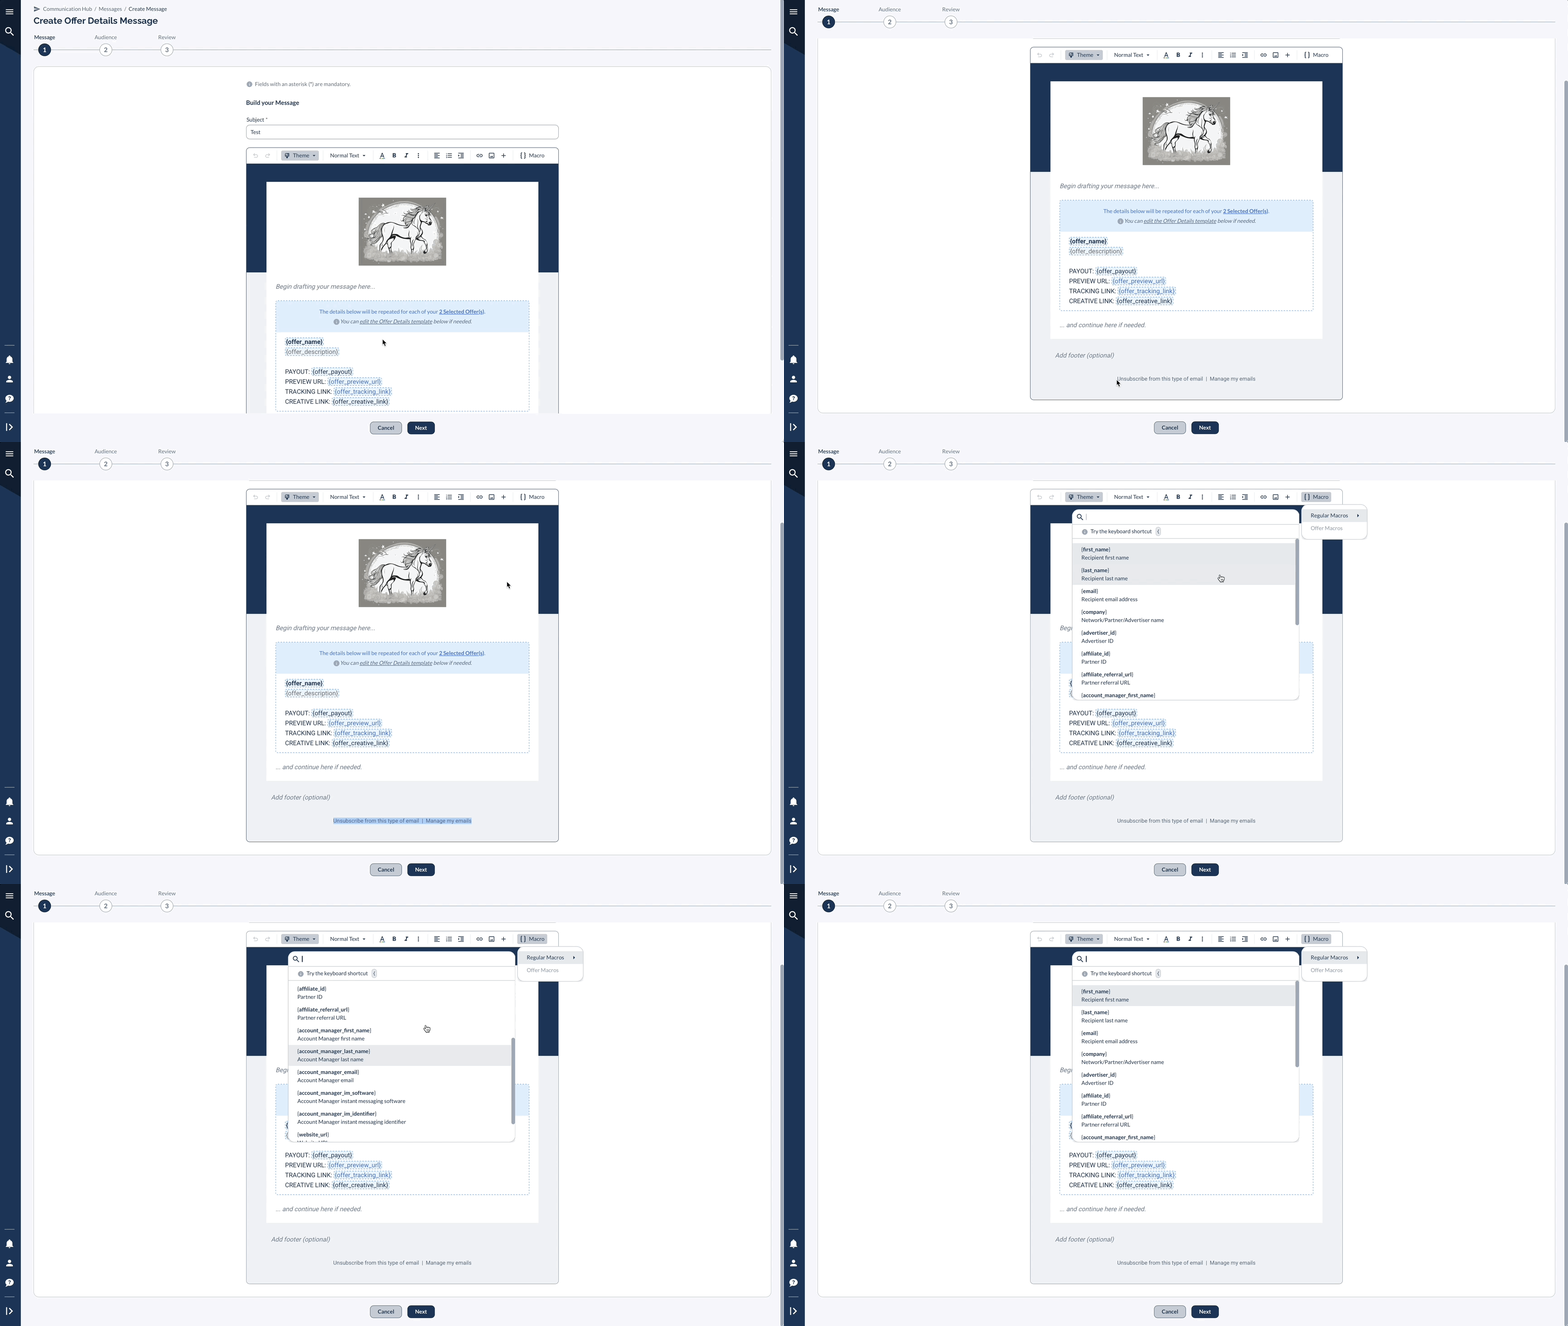
Note To comply with anti-spam regulations in various parts of the world, two links are automatically included at the bottom of every email:

1. An unsubscribe link

2. A link to manage your notification settings on Everflow‍

You can add an additional unsubscribe link within your message body using the {unsub_link} macro if desired, but this does not affect the automatic links at the bottom of the email.

Sending Options

1. Immediate Send

  • Review recipients
  • Verify content
  • Send immediately

2. Scheduled Send

  • Set date/time
  • Choose timezone
  • Schedule delivery

3. Save Options

  • Save as draft
  • Create template
  • Save audience rules

Best Practices

Message Creation

  1. Use clear subject lines
  2. Test macros before sending
  3. Preview for all recipient types
  4. Check formatting across devices

Audience Selection

  1. Verify recipient list
  2. Double-check rules
  3. Save common audiences
  4. Export for verification